2011年8月30日星期二

How to Convert DVD and Video to Any Video Format You Want Freely

Convert DVD and video is really easy for most of people now. You just need a DVD converter and a video converter. Use dvd converter to convert your DVD and use video converter to convert video. Do you want only one converter that can help you to convert both DVD and video in one interface with few clicks and high output quality. Today I will introduce you a Total Media Converter that convert both DVD and video.

You need to download and install it first before you can use it.

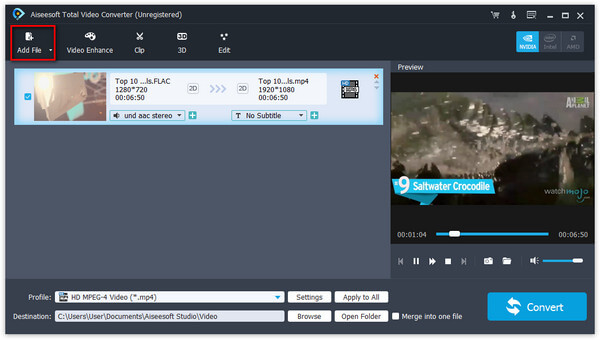
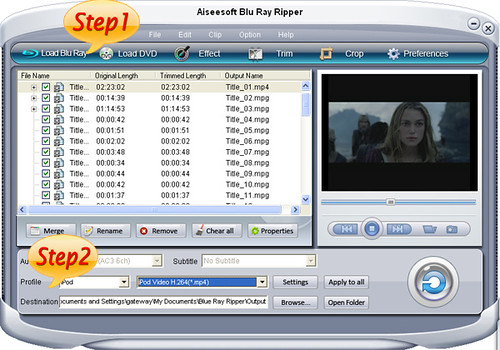
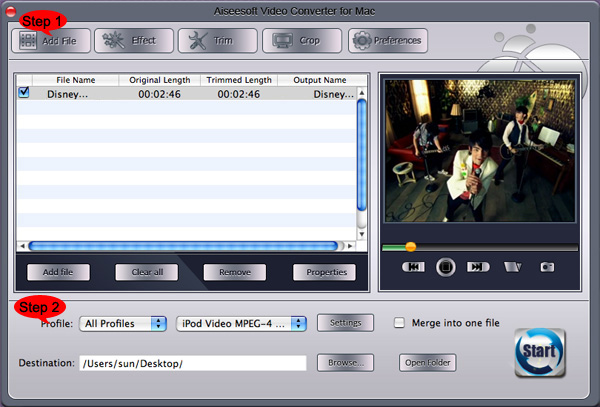
Step 1: Load DVD/Video
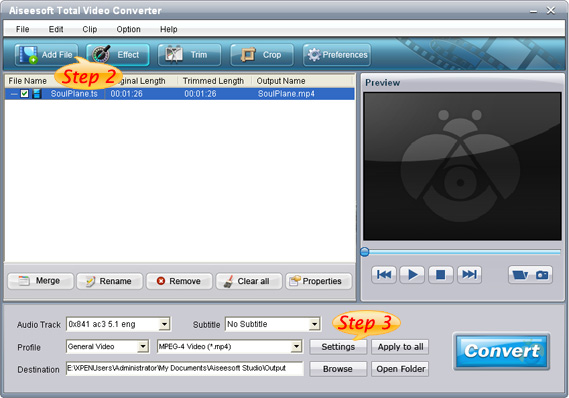
Click “Add File” to load Videos from your computer
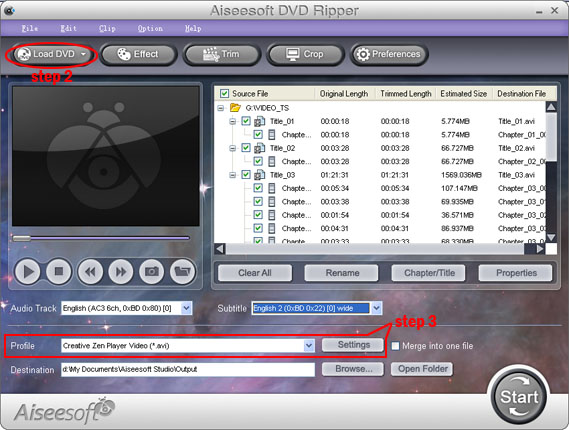
Click “Load DVD” to load your DVD from your DVD Drive


Step 2: Choose Output Info
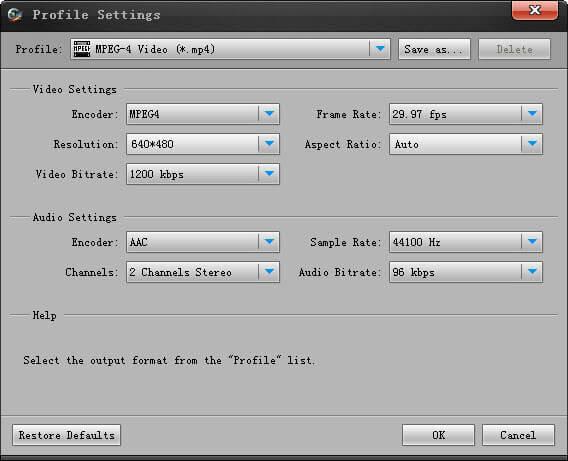
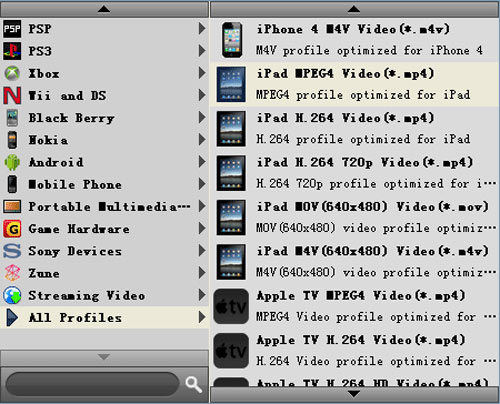
a. Convert video:
Choose output profile first in the drop-down list and then click “settings” button to adjust the specific settings, such as “resolution”, “encoder”, “bit rate”, “frame rate” and some audio settings such as “audio encoder”, “sample rate” and so on. You can save your profile and settings and give it a name, so you can use it next time easily.
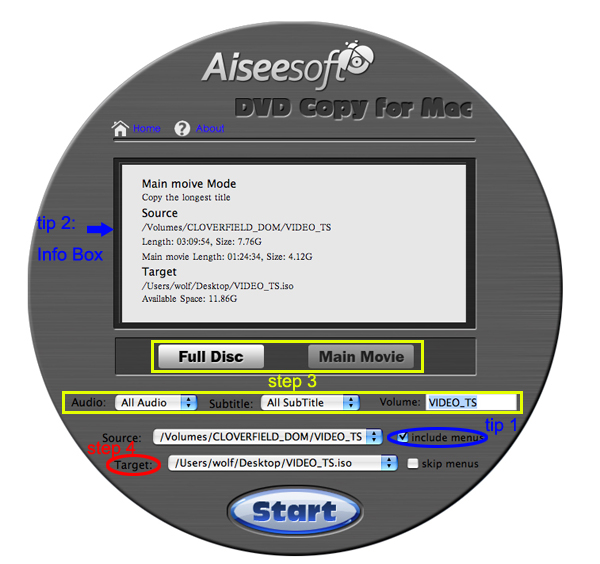
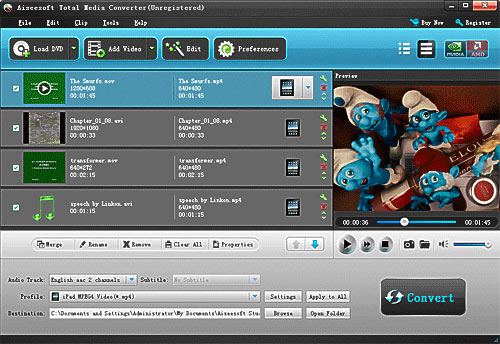

b. Convert DVD
Choose output profile first and then you need to choose your output audio track and subtitle, if you do not want them you can leave them blank. Also like convert video you can adjust the specific output settings, such as “resolution”, “bit rate” and so on.
Save the profile and settings for next use is also available.
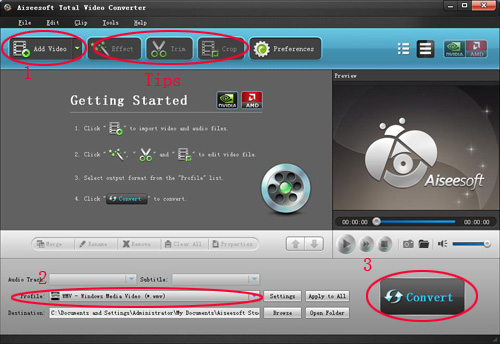
Step 3: Conversion
Click “Convert” button to start your conversion. You will get your output video soon.

Tips:

1. Adjust the output effect
You are allowed to adjust the “Brightness”, “Contrast” and “Saturation” of the output video. “Deinterlacing” is also available to improve the quality of the output video. You can choose “apply to all” to save your time.

2. Pick up a part to convert
If you do not want to convert the whole video or DVD you can just pick up the part that you want to convert using “Trim” function.
You can do it in 3 ways:
a: Enter the start time in the Start Time box and click OK, then enter the end time in the Set End Time box and click OK.
b: Drag the scissors bars under the preview window when you want to trim, then the time will be shown in the Start Time box and End Time box for your reference.
c: While playing video, click “Trim From” button where you want to begin your trimming and click “Trim To” button where you want to stop your trimming.

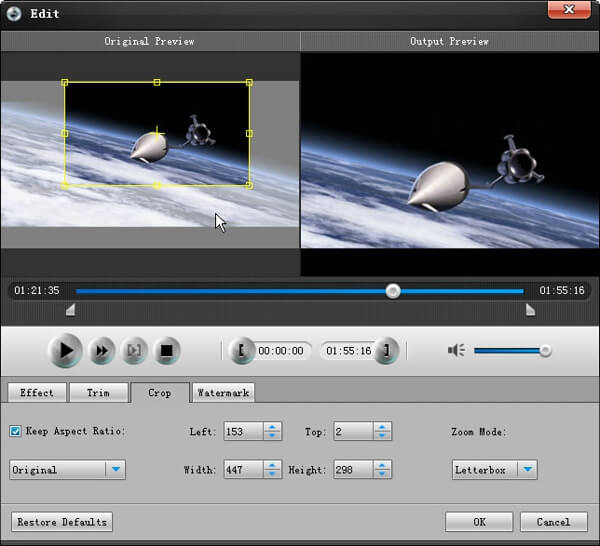
3. Crop the output video
This powerful video converter allows you to crop the video play area. You can choose a certain play area to convert, and do snapshot.
You can crop your output video in 2 ways:
a: Crop by adjusting the crop frame
The crop frame is the yellow line around the movie video. There are eight small adjustment boxes on the crop frame. Each adjustment box allows you to crop the movie video from a different position. To crop your movie video, you can just move your mouse cursor to an adjustment box and drag the crop frame.
b: Crop by setting the crop values
There are four crop values on the buttom of the window: Left, Top, Right, Bottom. You can set each value to crop your movie video, and the crop frame will move accordingly.

You can also set the output aspect ratio from the Zoom Mode according to your need. There are four choices available: Keep Original, Full Screen, 16:9 and 4:3.

4. Add watermark to the output video
You can add text and picture watermark to your output video easily with Aiseesoft Total Media Converter.
Check the “Enable Watermark” box and choose “Text” or “Picture” as you want.
You can drag the watermark to find the place you want to put and also you can adjust the Font info of the words you from “T” button.

2011年8月27日星期六

How to Copy DVD/ISO image/DVD Folder to DVD/ISO image/DVD Folder for Windows/Mac

When you have bunches of DVD movies, it is really hard to take care of them. The disc is really easy to break. So make a copy of your DVD movies to another DVD disc or ISO image or DVD Folder. How?
When you have bunches of DVD movies, your friends must come and borrow your movies to watch. How to protect your movie disc from being broken? Borrow them a copy?
How?
When your family have a party and it is really sweet, everyone wants to have a copy of the party's video. But they make only one DVD of it. How to make everyone has the record of the happy time? Copy the DVD.
How?

These problems are easy to solve now, if you have this powerful DVD Copy Software.
It can help you to make copys of your DVD. If you want to backup your DVD movies, you can choose to copy the full disc or the main movie. It can also copy a DVD to ISO image and DVD Folder on your computer. Also it can copy your ISO image or DVD Folder to a DVD disc to play in DVD player.

Here is a simple guide for you to follow:
For Windows users:


Step 1 Choose Source:
The source of this DVD copy software can be:
1: DVD disc
2: ISO image
3: DVD Folder
Tip 1: The specific information of the DVD disc will be shown on the top-left of the interface.

Step 2. Preparation
Before you click the “Start” button,
1. You can choose to copy the full disc or the main movie.
2. You can choose the audio, subtitle of the copy.
3. You can change the name of the volume.
4. You can choose to “include menu” or “skip menu” or neither of them.

Step 3. Choose Target:
You can save your DVD movie as:
1: DVD disc
2: DVD Folder
3: ISO Image File

Step 4: Start Copy

Click “Start” button to start the copy.

Tip 2:
You can change the “Preference”, when you click “Edit” button.

For Mac users:

This DVD Copy for Mac software is the best DVD copy for Mac users.
Let's begin to copy DVDs:
Step 1: Download and install DVD Copy for Mac


Step 2: Load Your Source
This excellent DVD copy for Mac allows you to load DVD folder and DVD image ISO.

Step 3: Choose Output Info
1. “Full Disc” or “Main Movie”
This DVD copy for Mac enables you to copy the full disc and also the main movie according to your need.

2. “Audio”, “Subtitle” and “Volume” name
You can choose your output audio from the “Audio” drop-down list, such as “all audio”/ “None”/ or some audio the DVD provide.

Subtitle is always an important thing, you can choose your output subtitle in “Subtitle” drop-down list.

You can also name your output volume's name

Step 4: Choose Your Target
You can copy your DVD to another DVD disc, DVD folder or DVD image ISO.

Tips:
1. You can also choose to copy the menus or not.
2. All the info you choose will be displayed on the “Info Box”.

2011年8月24日星期三

Best iPad Converter Supports More Portable Devices and Various Video Formats

Is iPad still the dominant tablet on the market? The answer is, absolutely, yes. During the second quarter of 2011, around 75% of tablets shipped worldwide were iPads and 20% were Android, according to ABI research. Although there is much room for the expansion of the tablets market, it is still hard to change the current situation in which Apple is the leader of this industry, with iPad continuing to gain popularity among tablet customers. However, iPad itself has disadvantages and limitations. For instance, it does not support flash videos and most of the video formats such as MPG, MPEG, MPEG 2, RMVB, AVI etc. Thus, Aiseesoft has created the Best iPad Converter for iPad users to convert any video format to iPad compatible formats.

As a professional iPad converter, the Best iPad Converter possesses strong and powerful functions to convert almost all popular video formats including MPG, MPEG, MPEG 2, RMVB, AVI, MTS, M2TS, VOB, DAT, MP4, M4V, TS, RM, FLV, SWF, MPV, MOD, TOD, QT, MOV, DV, etc and HD video to iPad with fast conversion speed and high image and sound qualities. What is more, this iPad Converter can also convert DVD files to iPad. Now iPad (iPad 2), iPod, iPod touch, iPod nano, iPod classic, iPhone (iPhone 4), Apple TV are all supported by this magic software.

The powerful editing functions enable users to customize the output files according to their preference. Users can trip any segment of a video, crop the video frame, merge several videos together to get a whole single one, adjust video effects and add watermark to videos and so forth. Once using the iPad Converter, you will be attracted by its magic power.

In a word, the Best iPad Converter can help users convert both videos and DVD to iPad with excellent performances. With it, you can easily enjoy any video on iPad without considering whether your iPad is compatible with the format or not. So please have a try! You cannot miss it.

Price and Availability

Aiseesoft iPad Converter is now priced at $ 35.00

2011年8月20日星期六

How to rip DVD to Motorola, like Milestone, Droid, ATRIX, etc?

Recently, Motorola has released many wonderful Android phones, like Milestone, Droid, ATRIX, Defy, etc. All these phones have powerful video playback functionality. With any one of them, you could conveniently watch videos and movies when travel on a train or some other public vehicles. Because of the format compatibility issues, Motorola phones only support certain video format like MP4. So if you want to enjoy DVD movie on Motorola phones, you need use a DVD to Motorola Phone Ripper to rip any DVD to Motorola Droid, Milestone, ATRIX, etc. compatible format.

This guide offers a solution on how to rip DVD to Motorola phones with Aiseesoft DVD to Motorola Phone Ripper.

Step 1: Install and run the DVD to Motorola Phone Ripper

First, you need to free download Aiseesoft DVD to Motorola Phone Ripper and install it on your computer. Then you can launch the application.

DVD to Motorola Phone Ripper

Click the "Load DVD" button to load your DVD movie from the target drive. And all the DVD titles and chapters will be listed on the interface.

Step 2: Edit output video effect

This DVD to Motorola Phone Ripper provides users with powerful video editing features. If you are not satisfied with the original DVD movie effect, you can cut off any DVD segment, crop video frame, add watermark, modify video brightness/saturation/contrast/hue/volume, and so on.

edit DVD effect

Step 3: Set output format

Click the "Profile" drop-down list to choose the proper output format according to your Motorola phone. Here we take the Droid as an example, you can follow "Android" > "Motorola Droid Video (*mp4)". If you don't find your phone model, you just follow the "Android" > "Android MP4 Video (*mp4)". Also you can specific settings for your Motorola phone by clicking the "Settings" button. You can set the Video Resolution, Video Bitrate, Frame Rate, Encoder and Audio Channels, Sample Rate, Encoder, Audio Bitrate, and so on.

choose output profile

Step 4: Start ripping DVD to Motorola Milestone, Droid, ATRIX, etc.

Now click the "Convert" button and let the DVD to Motorola Phone Ripper do the rest converting task. After the conversion you could transfer the output Motorola video files to Motorola phone memory card and play them freely on Motorola Droid, Milestone, ATRIX, Droid X, etc.

2011年8月19日星期五

How to convert video to Motorola Xoom?

Motorola Xoom, armed with the advanced Android 3.0 Honeycomb operating system, is with a resolution of 1280x800. HD videos can be played perfected on Motorola Xoom so without doubt it is an ideal portable device for video playing.

However, the Motorola Xoom does not support all video and audio formats by nature. According to the specifications, Xoom compatible formats including AAC, H.263, H.264, MP3, MPEG-4, ACC+ Enhanced, OGG, MIDI, AMR NB, AAC+, etc.

So if you want to enjoy other video files, like AVI, MKV, MOV, FLV, VOB, WMV, AVCHD, etc. on Xoom, you need the third-party Xoom Video Converter to help you convert your video to Xoom compatible formats. Here I recommend you the professional Aiseesoft Motorola Xoom Video Converter, which is the powerful video converting tool to convert any popular video files to Xoom. Please follow this guide to convert your video to Xoom.

Step 1: Download and install the Xoom Video Converter

First, please free download this Motorola Xoom Video Converter and install it on your computer.

Step 2: Run the application and add video files

Click the "Add Video" button to input your source file. The added video will be listed on the program panel and you can change the file order, file name and get detailed information of the original file.

add video to Motorola Xoom Video Converter

Step 3: Select the target output format

Click on the drop-down list of "Profile" to select the suitable output format for your Motorola Xoom. For instance, you can follow "Android"> "Android MP4 Video (*.mp4)".

choose output profile

Step 4: Set specific video and audio parameters

If you have higher expectation on the output file quality, you can click "Settings" button to adjust audio and video parameters like Video Encoder, Frame Rate, Video Bitrate, Resolution, and audio settings, including Audio Encoder, Sample Rate, Channels, Audio Bitrate, etc. in the following popup window.

Step 5: Start to convert video to Motorola Xoom

After you have set up all the conversion settings, make sure that the added video is checked in the file list and then click the "Convert" button to start converting video to Motorola Xoom.

2011年8月18日星期四

Aiseesoft Releases All-in-one iPad 2 Assistant Tool - iPad 2 Software Pack

To provide iPad 2 users with the best all-round services, Aiseesoft launches the iPad 2 Software Pack at the time of iPad 2's entering the market.

Aiseesoft iPad 2 Software Pack is a wonderful and full-featured software bundle, which is packed with DVD to iPad 2 Converter, iPad 2 Video Converter, iPad 2 Transfer, iPhone Ringtone Maker and iPhone SMS Transfer. The packed DVD to iPad 2 Converter and iPad 2 Video Converter are able to help users convert DVD and video files to iPad 2 video and audio formats, such as MP4, H.264, MP3, etc. Also all these two software possess powerful video editing functions. You can cut off any segment from a video, join videos together, add text/image watermark to your video, crop video frame, and so on.

The iPad 2 Transfer can also assist you with transferring video, audio and photo files between iPad 2 and computer. With this transferring software, you can conveniently backup your iPad 2 files to computer and add your local files to iPad 2. Also this iPad 2 Transfer can convert DVD/video files to iPad 2 and transfer the output files to iPad 2 directly.

This iPad 2 Software Pack can help you manage iPhone ringtones and SMS. It can create your own iPhone M4R ringtone with any DVD and video source. The built-in iPhone SMS Transfer could transfer iPhone SMS to computer and save it as .txt file and copy Contacts to local disk as .vcf file. Also it can backup the iPhone SMS and Contacts to your computer. You can directly delete the backup messages from the backup file.

System Requirements

OS Supported: Windows NT4/2000/2003/XP and Windows Vista, Windows 7

Hardware Requirements: 800MHz Intel or AMD CPU, or above; 512MB RAM or more

2011年8月17日星期三

Best iPad Converter Reviews

All of us who have got iPad are looking for best and easy converter programs with the enjoyment of iPad miracle. In this way it will become more convenient to enjoy music, movie video and ebook, etc.. I found several programs that are really easy to use.
No. 1 iPad Converter Suite
iPad Converter Suite is the first choice for all because it can rip DVD, convert video to iPad and transfer files from iPad to computer. Only program can do almost all things.


No. 2 Free iPad Video Converter
iPad Video Converter is a wonderful simple and easy iPad video converter. It can convert almost all video formats to iPad which lets you enjoy watching any video on your iPad anywhere and anytime.

No. 3 DVD to iPad Converter
DVD to iPad Converter is mainly to rip DVD for iPad to MPEG, MP4, AVI, WMV, RM, DivX etc..
In addition, these programs above are good video editor. They can trim, crop and add watermark to video. All are so easy to meet your requirement.


2011年8月16日星期二

How to Put Your Blu Ray DVD to Your iPod/iPhone?

Blu-ray movies are replacing the standard DVD movies for its sharper, brighter, and more detailed. You will feel you are watching movies in theater except the size of your and you are in your home. Blu-ray is so nice that many people will think of putting them on their iPod or iPhone. It is possible that if you have a nice Blu Ray Ripper and maybe an
iPod Transfer and
iPhone Transfer

Part 1: How to Rip Blu Ray DVD movies to iPod iPhone video format?

Before you run this blu-ray ripper you need to install any dvd
Here is a free download link:
http://static.slysoft.com/SetupAnyDVD.exe

Step 1: Load your BD

Load your BD disc in to your blu-ray driver.


Step 2: Output Profile

Choose your output profile from the drop-down list according to your need. You choose output

format as the generatoin of your iPod and iPhone.
You can also set the specific settings of your output video, such as ''resolution'“video

bitrate” “encoder” and so on.

After you have done all the tings above, you need to click the start button to convert your blu-ray disc.

Tips:

You can also do many video editing works about your output video.

1. Effect:
You can adjust the “Brightness”, “Contrast”, “Saturation” of your output video and also you can select to use
the “deinterlacing” function which make your video more enjoyable.
2. Trim
To pick up any part of your BD movie to converter, you can use “Trim” function.
3. Crop
You can choose any play area to convert by using the Crop function.
4. Watermark
You can add your own watermark on the output video, the watermark can be words and also picture. You can choose the font of your words and other really enjoyable function

Part 2: How to Put Your Movies on Your iPod iPhone?

Step 1: Run iPod Transfer and Plug your iPod or iPhone to your computer

This powerful iPod Transfer can recognize your iPod or iPhone automatically and show the info of your iPod or iPhone on the interface.

Step 2: Choose the movie

Click the "Computer to iPod/iPhone" button and you are allowed to choose file and folder.

You just need to find your converted movie on your computer and click ok. Your movie will be delivered to your iPod or iPhone directly.

2011年8月15日星期一

How to rip a DVD, convert video and transfer music from ipod to computer with only one tool

This guide aims to show you how to rip a DVD, convert video and transfer music from ipod to computer with only one tool.
It includes 3 parts:
Part 1. How to rip DVD to iPod/iPhone/Sansa/PSP/Zune and other MP4 and MP3 Players
Part 2. How to convert all video to MP4, AVI, FLV, 3GP, WMV, MOV, MPG, RM, RMVB, MKV, VOB…
Part 3. How to backup iPod songs and videos on your computer


Believe or not, to do the things above what you need is download Aiseesoft DVD Converter Suite and few clicks.

Part 1. How to rip DVD to iPod/iPhone/Sansa/PSP/Zune and other MP4 and MP3 Players.
Step 1. Click “DVD Ripper” on the main interface to run Aiseesoft DVD Ripper.


Step 2. Open your DVD Drive and put your DVD in it, then click “Load DVD” and choose “Load DVD” to load your DVD into this best DVD ripper.
Step 3. Choose your output format from the “profile” drop-down list. This best DVD ripper provides you so many formats that out of your expectation, such as “iPod video MPEG 4 (*.mp4)”, “iPhone 3G MOV 640*480 (*.mov)” and so on.

After you choose your output format, you can adjust your output video’s settings, such as “Resolution”, “Frame Rate”, “Bitrate”, “Sample Rate” and so on.
Click “Start” now to begin your conversion and you will get your video soon.

To make your output movie more enjoyable you can do some editings to it through this best DVD ripper. You can choose a part of your movie to convert (trim), remove the black edges of your DVD movie (crop) and also adjust the effect (effect) and select subtitle and audio track.

Part 2. How to convert all video to MP4, AVI, FLV, 3GP, WMV, MOV, MPG, RM, RMVB, MKV, VOB…

Step 1. Click “Total Video Converter” on the main interface to run Aiseesoft Total Video Converter

Step 2. Click “Add File” to load the video you want to convert.
Step 3. Choose output format by clicking “profile” and customize your own output video by
clicking “settings” to adjust the Resolution, Frame Rate, Bitrate and so on.
Before you click “Start” to begin your conversion, you can do some editing works, such as pick up a part of your video to convert(trim), choose your own play region(crop) and put two or more files into one.(merge into one file).
OK, now you can begin your conversion.

Part 3. How to backup iPod songs and videos on your computer.
Step 1. Click “iPod to Computer Transfer” to run Aiseesoft iPod to Computer Transfer.


Step 2. Plug your iPod to your computer and the Aiseesoft iPod to Computer Transfer can automatically scan and find your iPod.
Step 3. Choose the songs and videos you want to backup.
Step 4. Click “export to PC” button to transfer your songs and videos to your Computer.

2011年8月12日星期五

How to convert DVD to iPad video on Mac?

With an amazing 9.7-inch high-resolution display, Apple iPad is perfect for watching any kind of video. However, if you want to enjoy your DVD movie on iPad, you need a professional DVD to iPad Converter. For Mac users, Aiseesoft DVD to iPad Converter for Mac is an excellent Mac DVD to iPad converting software, which is able to rip any DVD movie to iPad on Mac with perfect output iPad video quality.

The following step by step guide shows you how to convert DVD to iPad on Mac using Aiseesoft DVD to iPad Converter for Mac.

First, you need to free download this DVD to iPad Converter for Mac and install it on your computer.

Step 1: Load DVD

Click the "Load DVD" button to input the source DVD movie to this Mac DVD to iPad Converter.

After a DVD or several video files are imported successfully, you can see all of them listed in the program:

load DVD to DVD to iPad Converter for Mac

Step 2: Choose the output iPad format

This DVD to iPad Converter for Mac provides users with all video formats supported by iPad, iPhone, iPod, etc.

Click the Profile to open the output format drop-down list and choose an output format you need for iPad.

choose output profile

Step 3: Start converting DVD to iPad on Mac

Click the "Convert" button to start DVD to iPad conversion on Mac. When the conversion is done, you can transfer the output video to iPad and enjoy it anywhere and anytime.

DVD to iPad Converter

2011年8月10日星期三

How to convert Blu-ray disc to MKV on Mac?

If you are a Mac user, and you want to enjoy your high definition Blu-ray movies anywhere and anytime, you need a professional Blu-ray to MKV converting software. And Aiseesoft Blu-ray to MKV Converter for Mac can help users solve this problem.

With this Mac Blu-ray to MKV Converter, users can easily convert Blu-ray disc to MKV files on Mac with the perfect output video quality. Then users can enjoy the MKV video on Mac or other portable devices anywhere and anytime. Now this guide will show you how to convert Blu-ray disc to MKV on Mac.

Step 1: Install Mac Blu-ray Disc to MKV Converter

Please free download and install Blu-ray to MKV Converter. Then launch this software to prepare ripping Blu-ray disc.

convert Blu-ray disc to MKV on Mac

Step 2: Load Blu-ray disc

Insert your Blu-ray disc to the external Blu-ray drive and click the "Load Blu-ray" button to input your Blu-ray movie.

Then you can preview the source Blu-ray movie with the built-in player.

load Blu-ray disc

Step 3: Edit Blu-ray movie effect

Aiseesoft Blu-ray to MKV Converter for Mac owns powerful video editing features. You can click the "Edit" button to enter the "Edit" interface. Here you can trim video length, crop video frame, watermark video, adjust video brightness/saturation/contrast, and so on.

edit Blu-ray effect

Step 4: Set output formats

Click the "Profile" button to select the output format - "All Profiles" > "MKV Video Format (*.mkv)".

choose output profile

Tips: You can click the "Settings" button to adjust Video Encoder, Frame Rate, Video Bitrate, Audio Encoder, Sample Rate, Channel, and Audio Bitrate.

Step 5: Start converting Blu-ray disc to MKV on Mac

After all these steps, you can click the "Convert" button to begin the Blu-ray to MKV conversion. Just a while, you can get the high-quality MKV files from Blu-ray disc, then you can enjoy the videos freely.

How to rip DVD, convert video, transfer iPod music and make iPhone ringtone for Windows/Mac

It includes 4 parts:
Part 1. How to rip DVD to iPod/iPhone/Sansa/PSP/Zune and other MP4 and MP3 Players
Part 2. How to convert all video to MP4, AVI, FLV, 3GP, WMV, MOV, MPG, RM, RMVB, MKV, VOB…
Part 3. How to transfer music from iPod to computer, computer to iPod, iPod to iPod
Part 4. How to make your own iPhone ringtone for free


Believe or not, to do the things above what you need is download Aiseesoft DVD Software Toolkit and few clicks.

Part 1. How to rip DVD to iPod/iPhone/Sansa/PSP/Zune and other MP4 and MP3 Players.

Step 1. Click “DVD Ripper” on the main interface to run Aiseesoft DVD Ripper.


Step 2. Open your DVD Drive and put your DVD in it, then click “Load DVD” and choose “Load DVD” to load your DVD into this best DVD ripper.

Step 3. Choose your output format from the “profile” drop-down list. This best DVD ripper provides you so many formats that out of your expectation, such as “iPod video MPEG 4 (*.mp4)”, “iPhone 3G MOV 640*480 (*.mov)” and so on.

After you choose your output format, you can adjust your output video’s settings, such as “Resolution”, “Frame Rate”, “Bitrate”, “Sample Rate” and so on.
Click “Start” now to begin your conversion and you will get your video soon.

To make your output movie more enjoyable you can do some editings to it through this best DVD ripper. You can choose a part of your movie to convert (trim), remove the black edges of your DVD movie (crop) and also adjust the effect (effect) and select subtitle and audio track.

Part 2. How to convert all video to MP4, AVI, FLV, 3GP, WMV, MOV, MPG, RM, RMVB, MKV, VOB…

Step 1. Click “Total Video Converter” on the main interface to run Aiseesoft Total Video Converter


Step 2. Click “Add File” to load the video you want to convert.

Step 3. Choose output format by clicking “profile” and customize your own output video by
clicking “settings” to adjust the Resolution, Frame Rate, Bitrate and so on.

Before you click “Start” to begin your conversion, you can do some editing works, such as pick up a part of your video to convert(trim), choose your own play region(crop) and put two or more files into one.(merge into one file).
OK, now you can begin your conversion

Part 3. How to transfer your songs and videos bewteen iPod and computer/iPod

First, Click “iPod Transfer” to run Aiseesoft iPod Transfer

Click “Computer to iPod” button, it will allow you to transfer songs and videos from your computer to iPod easily.

Click “iPod to Computer” button, it will allow you to backup your songs and videos from iPod to your computer.

Click “iPod to iPod” button, it will allow you to transfer songs and videos from one iPod to another iPod dirrectly.

Part 4. How to make your own iPhone ringtone for free

Download Aiseesoft iPhone Ringtone Maker


Step 1: Click “Browse” on the right side of "Input File" to import the file that you want to make ringtone from it.

Step 2: Play it and listen the music to find the segment that you want to use it as ringtone. Then drag and click the start & end slider to set your wanted segment, or type the start & end time in the corresponding text box directly to get the exact segment. You also can pre-listen the converted audio before generate.

Step 3: Click “Browse” on the right side of "Local Output Folder" to choose the output destination.

Step 4: Check "Export to iPhone" option, the converted ringtone will be load to your iPhone directly.

Step 5: After all the settings are finished, click “Generate” to begin making your own iPhone ringtone.

If you are a Mac user, I recommend you Aiseesoft DVD Software Toolkit for Mac
it has the same functions as the windows one. You can use it easy rip your DVD, convert your videos, transfer your iPod songs and videos bewteen iPod and your Mac and also make your own ringtone.

2011年8月4日星期四

How to convert DVD to iPod/iPhone/Sansa/PSP/Zune/iRiver/Google Phone/Cell Phone, etc. on Mac

Many people like enjoy movies at home and they have piles of DVDs. So do I. I like watch lastest movie on my new Mac and it is wonderful. However, I always break and lose my DVDs and I was really sad because they cost most of my money. Luckily, I find a way to store my DVD movies on my new Mac computer and evern put it on my iPod because I use a DVD Ripper for Mac and it can rip DVDs to so many video formats, such as AVI, MP4, MOV, MKV, WMV, DivX, XviD, MPEG-1/2, 3GP, 3G2, VOB and so on.

To do this you must have a nice dvd ripper for Mac. So I find Aiseesoft DVD Ripper for Mac

OK, let’s do it.
Step 1. Download and install Aisesoft DVD Ripper for Mac.

For Intel

For Power PC

Step 2. Load you DVD.
Click the “Load DVD” button(a), find the DVD folder of the movie you want to add from your DVD-ROM, and Click “Open”.


Tick the check boxes(b) before the titles and chapters that you want to rip.

Step 3. Chose output profile and settings.
Selecting output format is really easy, you can chose your output format according to your devices players and the default setting works great.

For a veteran of digital player, you could customize your own settings by clicking “Settings” button to chose your own video resolution, frame rate, bit rate, encoder, etc.

Tips: Sample rate (Hz) = any value up to 48000 (higher value = better sound quality = bigger file)
Bitrate (kbps) = any value up to 160 (higher value = better sound quality = bigger file)


After setting your own output and settings you can click “Start” button to start your conversion. (The time of the conversion depends on your DVD and the settings you chose.)

Do a few more clicks to make your movie more enjoyable.
1. Trim


If you want to rip only a part of the DVD movie, please click “Trim” button and drag the “Start trim slider” to set the start time and “End trim slider” to set the end time.(a). You can also do that by clicking the “Start trim button” and “End trim button”(b). The third way you do that is set the exact Start/End time at the right of the pop-up window and click “OK”.

2. Crop
If you want to remove the black edges or you want to rip a certain area of your video, please click the “Crop” button. You can do this either by drag the frame around the movie (a) or set the crop value: “Top, Left, Bottom, Right”.(b). Another way to do that is choose mode from “Crop Mode”(c).
Aiseesoft DVD Ripper for Mac also allows you to choose the output aspect ratio above the crop pane, “Keep Original, full screen, 16:9 and 4:3” are available.

3. Effect
If you want to adjust the effect of your movie, please click the “Effect” button and a pop-up effect window will appear. It allows you to edit your movie’s effect including “Brightness, Contrast, Hue, Saturation and Volume”.

4. Merge into one file/audio track/subtitles
If you would like to put several titles and chapters into one output file, please tick the check box of the “Merge into one file”.
You can choose audio track and subtitles you like according to what you prefer and the DVD supports.

Follow what I said above I hope you could enjoy your DVD movies on your Mac and also on your iPod and other portable players

2011年8月2日星期二

How to Convert Video Files on Mac/Windows

Nowadays, people can enjoy videos in different ways, such as youtube.com and other online video websites, iPod/Zune and other portable players, and also play video on computer, and you can also make you own videos with windows movie make or iMovie for Mac users. So how to convert videos between different video formats is a big problem for both windows and Mac users. Today I will share you guys two powerful video converter for Mac and Windows users.

For Mac users, this powerful video converter for mac is really nice.
Let's use it to convert a video for Example


Step 1: Add File
Click “Add File” button to load the video you want to converter

Step 2: Choose profile and adjust settings
You can find your output video format from a drop-list called “Profile”
You can also adjust the specific settings of the output video, such as “Resolution”, “Bitrate”, “Encoder” and so on.

Step 3: Edit Video
1. Effect:
You can adjust the “Brightness”, “Contrast”, “Saturation” and “Volume”

2. Trim:
You are allowed to pick up any part of the video to convert.

3. Crop:
To remove the black edges and choose a play area to convert.

Step 4: Start Conversion
Click “Start” button to begin your conversion and you will get your video soon.

For Windows users, you need Total Video Converter.


Step 1: Load Video
You can load your videos into the converter by clicking “Add File”

Step 2: Choose output info
This converter provides you many output profiles for you to choose, you can choose your output profiles according to your need. And also you can just choose a certain video format.

You can also adjust the settings of your output profiles. You can even save a certain settings as your own output settings.

Step 3: Conversion
Click “Start” button to begin your conversion and few mins later you can get your video.

Tips: How to effect, trim and crop the video to improve your output video quality.
After your Load your video you can click “Effect” button to access the effect panel

1: Effect
Adjust the video effect as you want: Brightness, Contrast, Saturation and Deinterlacing.

2: Trim
Clip your video, pick up any part of your video to convert.
You have 3 ways to do trim:

1.Dragging the slider

2.Controlling the “Trim From” and “Trim To” button

3.Setting the Start and End time

3: Crop
Adjust video size, Cut off the black edge of your video to let you enjoy your movie in full screen by click the 'Crop' button
You have 2 ways to do crop:

1.Move your mouse cursor onto one of the eight small adjustment boxes on the cropping frame and drag the crop frame to crop the video such as cutting off top and bottom black bar. The cropped result will be shown on the Output Preview at the same time

2.Type the value directly or set the value in "Left", "Right" and "Cropped area size" area to set the position of the cropping frame.

You can also select the aspect ratio from the Zoom Mode drop-down list. There are 4 choices for you: Full Screen, 16:9, 4:3 and Keep Original.