2010年4月30日星期五

How to Convert MKV Files

Next is the detailed guide to teach you how to convert MKV files with Aiseesoft MKV Converter.

Step 1 Free download Aiseesoft MKV Converter, install and run the software.

Step 2 Click Add File button to import your MKV files.

Convert MKV Files

Step 3 Click Effect, Trim, Crop to edit output video file.

Tips: Effect is used to adjust video Brightness, Contrast, Saturation; Trim can edit the start and end time of the output video; Crop function can adjust video aspect ratio.

Step 4 Choose your ideal output format from Profile list and click Browse… button to set destination folder to save the converted MKV file.

Step 5 After setting all parameters, press Start button to start MKV to video conversion.

In addition, this professional MKV to Video Converter provides powerful editing functions (Merge, Snapshot, Preview etc.) for you to make use of. Know more functions at: Convert MKV files.

2010年4月28日星期三

How to Transfer Songs from iPod touch to Computer

Next is a step-by-step guide about how to tansfer songs from iPod touch to computer with Aiseesoft iPod Transfer.

Before operation, please install and run Aiseesoft iPod Transfer at first. The interface is like:

Transfer songs from iPod touch to computer

Step 1: Connect your iPod to computer via USB cable.

As soon as the connection is built up, the iPod/iPhone icon and its library and playlists will appear in the Device list.

Step 2: Open the library/playlist that you want to export files, and then check the file(s) you want to export in the file list.

Step 3: Click to select the destination of the exporting songs and start exporting songs.

The whole transferring process will be finished in a few seconds. In addition, Aiseesoft iPod Transfer also has the functions of importing files from PC to iPod and transferring between iPods. Want know more about it, please visit: Transfer songs from iPod touch to computer.

2010年4月27日星期二

How to Convert 3GP to MP4 on Mac

How to convert 3GP to MP4 on Mac? It is needed to know what 3GP is in the first place. 3GP is a multimedia container format used by mobile phones and was designed to make file sizes smaller so mobile phones could support video. Here Aiseesoft MP4 converter for Mac helps you out to convert 3GP to MP4 Mac.

Downloading free trial is available.

Intel Version

Power PC Version

How to Convert 3GP to MP4 on Mac?

How to convert 3GP to MP4 on Mac

Step 1, Double click the "Aiseesoft MP4 Converter for Mac" icon on your desktop to run it.

Step 2, Click "Add file" button on the left top of the main window to select video file(s) you would to convert to MP4, they can be 3GP, WMV, MOV, ASF … format.

Step 3, Select output format and choose output directory

Use the "Profile" to control the output format and select "MPEG-4 Video" as the output format.

convert 3GP to MP4 Mac

Use the "Browse" to select an output folder for saving converted MP4 videos.

How to convert 3GP to MP4 on Mac

Step 4, After all the preparations, just click "Start" to convert 3GP to MP4 on Mac.

Tip: If you want to try more editing, press

convert 3GP to MP4 Mac

2010年4月26日星期一

Time to Lawyer Up, iPhone Prototype Peddler

Who is liable in the iPhone prototype caper? We may soon find out.

The Santa Clara County district attorney’s office is investigating gadget site Gizmodo’s purchase of the device, according to a report by News.com. Sources tell News.com that the effort is being headed up by the office’s Rapid Enforcement Allied Computer Team.

According to those sources, investigators are looking at “whether sufficient evidence exists to file criminal charges,” though they did not say who is being targeted–the person who found Apple’s (AAPL) iPhone protoype or Gizmodo, which purchased the device for $5,000 and revealed it to the world, perhaps in violation of California’s Uniform Trade Secrets Act.

Gawker Media, which owns Gizmodo, says it hasn’t yet been contacted by law enforcement.

2010年4月25日星期日

Google Expands Its Behavioral Targeting Bulls-Eye

A year ago, when Google started testing its own version of “behavioral targeting” to track Web surfers’ visits, and serving them ads on other sites based on those visits, I predicted that the company was headed for a collision course with privacy advocates. Maybe even Congress. And who knows? That may still happen. But Google (GOOG) isn’t slowing down. Instead, the search giant is taking its “remarketing” program out of beta and opening it up to all of its advertisers.

2010年4月23日星期五

News Corp. Digital Exec Jeremy Philips Heads for the Exit

More change at News Corp.’s top ranks: Jeremy Philips, one of Rupert Murdoch’s top advisers, is heading out the door.

I’m told that Philips has a new job lined up and that he informed Murdoch of his plans in early January. But when I reached him this afternoon, he declined to comment. PaidContent first reported the move.

Philips is a behind-the-scenes guy (though very easy to find at New York media events) who weighed in on much of Murdoch’s digital mergers-and-acquisitions work, as well as big-picture strategy like pay walls, etc. I’d been told repeatedly that he had the ability to launch his own projects within News Corp., though if he did so, I was not aware of it. A recurring rumor mill item had him working on a fabled “LinkedIn-killer” for the company.

News Corp. folks want us to know that Philips was not forced out. But there’s definitely a changing of the guard at the company, occasioned by the ascension of Rupert’s son, James Murdoch.

News Corp. (NWS) owns Dow Jones, which owns this Web site.

2010年4月21日星期三

How to Convert M2TS to WMV

In the following, we shall get familiar with how to convert M2TS to WMV using this perfect M2TS to WMV Converter!

Firstly, we must confirm the M2TS to WMV Converter has been successfully installed, and then start it until we see the following interface:

M2TS  to WMV

Secondly, drag and drop M2TS files you want to convert to WMV to the play list. You can add one or more files and can also merge them into one for outputting.

Thirdly, in the Profile option, click the down-arrow to expand the menu and choose WMV as your output format. In the Destination option, you could choose one folder to save your files in order to find them easily later.

Fourthly, only click "Start" button to finish the conversion work - convert M2TS to WMV.

Want further editing functions? Go to how to convert M2TS to WMV .

How to Convert MP3 to M4R iPhone Ringtone

Step-by-step guide of how to convert MP3 into M4R iPhone Ringtone.

1. Download Aiseesoft iPhone Ringtone Maker, install and run the software. If you are Mac user, please use Aiseesoft iPhone Ringtone Maker for Mac.

2. Click Browse… on the right side of "Input File" to import the file that you want to make ringtone from it.

Convert MP3 to M4R iPhone Ringtone

3. Click to listen the music to find the segment that you want to use it as ringtone. Then drag and click the start & end slider to set your wanted segment, or type the start & end time in the corresponding text box directly to get the exact segment. Click to pre-listen the converted audio before generate M4R file.

4. Click Browse… on the right side of "Local Output Folder" to choose the output destination.

5. Check Export to iPhone option, the converted ringtone will be load to your iPhone directly.

6. After all the settings are finished, click Generate to begin making your own iPhone M4R ringtone.

Several minutes later, you can enjoy your own M4R ringtone on your iPhone. You can also convert other audio files to M4R iPhone ringtone. More information at: Convert MP3 to M4R iPhone ringtone.

2010年4月20日星期二

How to rip DVD to video audio files like AVI WMV MPEG FLV 3GP MP4 MP3

This DVD Ripper guide includes 4 parts:
How to convert DVD to iPhone/iPod/PSP/Zune/Apple TV/Phone/PS3/Xbox 360/Zen/Pocket PC/AVI/MPEG/MP4?
How to edit, combine, effect and cut DVD movies?
How to extract and rip audio from DVD to MP3 for iPod nano, shuffle and other MP3 players?
How to put DVD clips on Youtube, Myspace?

What you need is Aiseesoft DVD Ripper; you can download it for free here:
http://www.aiseesoft.com/dvd-ripper.html

Part 1: How to convert DVD to iPhone/iPod/PSP/Zune/Apple TV/Mobile Phone/PS3/Xbox 360/Zen/Pocket PC ?

Step1. Insert your DVD disc into your DVD-Rom, then run the software, click "Load DVD" button and add the DVD file. You can also add DVD/IFO from your hard disk by clicking “Load DVD” or “Load IFO File”.

Aiseesoft DVD Ripper - convert and rip DVD to AVI MP4 MPEG for  iPhone iPod

Step2. Ihis software can convert DVD to various video formats such as MPEG-4, AVI, WMV, FLV, 3GP, VOB, etc. Click the "Profile" drop down list to select a format.

Aiseesoft DVD Ripper - convert and rip DVD to AVI MP4 MPEG for  iPhone iPod

If you don't know much about mobile players, just select a format according to the name of your mobile player. For example, if you want to copy DVD to iPhone, just select "iPhone Video MPEG-4 (*.mp4)", and the default setting works great. If you want to customize the output video, you can click the "Settings" button next to the profile to open the Settings window and set video resolution, frame rate, bitrate, encoder, etc. See the figure below:

Aiseesoft DVD Ripper - convert and rip DVD to AVI MP4 MPEG for  iPhone iPod

Step3. Regular DVD movies usually have several subtitles such as English, French, German, etc. You can select one you prefer. You can also delete the subtitle by selecting "No Subtitle". Selecting Audio is the same.

Aiseesoft DVD Ripper - convert and rip DVD to AVI MP4 MPEG for  iPhone iPod

After the above steps, click "Start" to start conversion.

Next part: How to edit, combine DVD and extract DVD Clips from DVD?

2010年4月19日星期一

How to transfer music between iPod and Mac without iTunes

Most iPod users are not very good at using iTunes. It is very difficult to use, and you can not transfer your songs back to your computer when your computer crashed down, if it is not purchased from Apple Store. So I had not used iTunes for a long time on my Mac since I found Aiseesoft
iPod Manager for Mac

It can both backup your iPod songs, movie/video and image on your Mac and import your local files to your iPod anytime without worrying loosing other info.
This article aims to show Mac users how to import files to iPod without iTunes and backup iPod info on Mac.

Part 1: How to import songs/video/movie/image to iPod without iTunes. (Take put songs for example)
Step 1: Download and run Aiseesoft iPod Manager for Mac.

Step 2: Plug your iPod to your Mac
Aiseesoft iPod Manager for Mac can find it automatically.


Step 3: Pick up the files you want to put on your iPod
1. Click “Music”
2. Click “Mac to iPod” and pick up the songs on your Mac you want to put on your iPod and click “Open”


Few seconds later, it will on your iPod.
(If you want to put video/image, just click “Video”/“Picture” and other operation is the same as putting songs)

Part 2: How to backup iPod info on Mac
Step 1: Plug your iPod to your Mac
Aiseesoft iPod Manager for Mac can find it automatically.

Step 2: Pick up what you want to backup
Just click Music and all of your music on your iPod will be listed, so you can pick up which songs you want to transfer. (Click “Video”/“Picture”, if you want to backup your videos and image.)


Step 3: Click “iPod to Mac” and find where to put your iPod info on your Mac and click “Open”


Few seconds later, your iPod songs will be on your Mac.

2010年4月16日星期五

How to Copy DVD/ISO image/DVD Folder to DVD/ISO image/DVD Folder for Windows/Mac

When you have bunches of DVD movies, it is really hard to take care of them. The disc is really easy to break. So make a copy of your DVD movies to another DVD disc or ISO image or DVD Folder. How?
When you have bunches of DVD movies, your friends must come and borrow your movies to watch. How to protect your movie disc from being broken? Borrow them a copy?
How?
When your family have a party and it is really sweet, everyone wants to have a copy of the party's video. But they make only one DVD of it. How to make everyone has the record of the happy time? Copy the DVD.
How?


These problems are easy to solve now, if you have this powerful
DVD Copy Software. It can help you to make copys of your DVD. If you want to backup your DVD movies, you can choose to copy the full disc or the main movie. It can also copy a DVD to ISO image and DVD Folder on your computer. Also it can copy your ISO image or DVD Folder to a DVD disc to play in DVD player.

Here is a simple guide for you to follow:
For Windows users:


Step 1. Choose Source:
The source of this DVD copy software can be:
1: DVD disc
2: ISO image
3: DVD Folder
Tip 1: The specific information of the DVD disc will be shown on the top-left of the interface.

Step 2. Preparation
Before you click the “Start” button,
1. You can choose to copy the full disc or the main movie.
2. You can choose the audio, subtitle of the copy.
3. You can change the name of the volume.
4. You can choose to “include menu” or “skip menu” or neither of them.

Step 3. Choose Target:
You can save your DVD movie as:
1: DVD disc
2: DVD Folder
3: ISO Image File

Step 4: Start Copy


Click “Start” button to start the copy.


Tip 2:
You can change the “Preference”, when you click “Edit” button.


For Mac users:

This DVD Copy for Mac software is the best DVD copy for Mac users.
Let's begin to copy DVDs:
Step 1: Download and install DVD Copy for Mac


Step 2: Load Your Source
This excellent DVD copy for Mac allows you to load DVD folder and DVD image ISO.

Step 3: Choose Output Info
1. “Full Disc” or “Main Movie”
This DVD copy for Mac enables you to copy the full disc and also the main movie according to your need.

2. “Audio”, “Subtitle” and “Volume” name
You can choose your output audio from the “Audio” drop-down list, such as “all audio”/ “None”/ or some audio the DVD provide.

Subtitle is always an important thing, you can choose your output subtitle in “Subtitle” drop-down list.

You can also name your output volume's name

Step 4: Choose Your Target
You can copy your DVD to another DVD disc, DVD folder or DVD image ISO.

Tips:
1. You can also choose to copy the menus or not.
2. All the info you choose will be displayed on the “Info Box”.

2010年4月13日星期二

How to rip DVD to Sansa/iPod/iPhone/PSP/Zune and other MP4 and MP3 Players

This guide shows you how to rip DVD to MP4, AVI, MP3, WMV, WMA, FLV, MKV, MPG, RM, 3GP, and other video/audio formats supported by popular mp4 and mp3 players by using Best DVD Ripper.

Step 1: Install and run DVD Ripper

Step 2: Import DVD.
Place the DVD into your DVD drive and click the “Load DVD” button to load DVD.


Tips: This DVD Ripper can load three DVD source, you can load your DVD from DVD drive, DVD folder in your PC and also IFO file.

Step 3: Video settings.
Select the output video format you want from the “Profile” drop-down list.


Tips:
1: You can also select Audio Track and Subtitle from their respectively drop-down list.
2: If you like the current image of the video you can use the “Snapshot” opinion. Just click the “Snapshot” button the image will be saved and you can click the “File” next to “Snapshot” button to open your picture. You can select the destination of the picture by clicking the “Preference” button. As default the captured image will be saved at:
C:\Documents and Settings\Administrator\My Documents\Aiseesoft Studio\Snapshot
3: If you want to merge the selected contents into one file you can check the “merge into one file” option. As default the merged file is named after the first selected file (either a title or a chapter)
4: You can click the “Settings” button to set your video parameters.


In the Video Settings, you can select Encoder, Frame Rate, Resolution and Bitrate for your movie
In the Audio Settings, you can select Encoder, Channels, Bitrate and Sample Rate for your movie.
when you choose the specific settings, the lower window will show the "help" to explain the meanings of each setting.

Step 4: Start conversion
Click the “Start” button to start your conversion and in a short while it will be finished.

Step 5: Click “Open” button to open your output destination file.

More tips:

1: Trim Movie
If you just want to convert a clip from your DVD movie, you can click the “Trim” button to open the Trim dialog, you can trim a duration of the selected title or chapter by either dragging the Start Time and End Time sliders or setting the time parameters in each corresponding field.
After you set the trimming time, the length of the captured clip will be shown in the Select Length box for your reference.


2. Movie Effect
If you want to change the original video effect, you can click the Effect icon to set the video brightness, contrast, saturation, etc. You can also set the special effect for your movie to cater to your need.


3. Video Crop
With Aiseesoft DVD Ripper you can remove the black edges around your movie video by checking the “Crop” option, so you can watch your movie on your portable players in full screen.

There are three methods available to crop your video:
Method 1: Crop by selecting a crop mode
Select a crop mode in the crop mode drop-down list and click OK to save the crop. There are three pre-set crop modes
for your choice: No Crop, Cut off top and bottom black edges, Cut off top black edge.

Method 2: Crop by adjusting the crop frame
The crop frame is the dashed line around the movie video. There are four adjustment lines on the crop frame. Each line allows you to crop the movie video from a different position.
To crop your movie video, you can just move your mouse cursor to an adjustment box and drag the crop frame.

Method 3: Crop by setting the crop values
There are four crop values on the lower left part of the crop window: Up, Down, Left and right. You can set each value to crop your movie video, and the crop frame will move accordingly.


Before you start to crop your movie video, you can select an output aspect ratio from the Zoom list. There are four choices available: Full screen, Keep original, 16:9 and 4:3. After you select an output aspect ratio and finish the crop, the result can be previewed in the Preview window of the program main interface.

2010年4月12日星期一

How to convert DVD/movies to DPG

Have you always been thinking convert your movies and play on your Nintendo DS? The wondering can stop now. Here I recommend you you two ways to do that. One way is Moonshell + BatchDPG + AviSynth. This way is really hard to operate but it is free. The other way is really easy to do and it cost you a little: Moonshell + DPG Converter.

DPG- the abbreviation of nDs-mPeG, is a special format of MPEG-1 video specifically for playback using the homebrew Moonshell program for the Nintendo DS. The video is encoded on a computer and then transferred, along with Moonshell, to the DS for playback.

Part 1. How to convert movies to DPG with Moonshell/BatchDPG/AviSynth
There are a few things you need to download:

Moonshell
ffdshow
AviSynth
BatchDPG
Microsoft .NET


Step 1: Download all the programs
Tips: When you download Batch from the link in my post do not forget to copy “avisynth.dll” to C:\Windows\System32 directory.


Step 2: Input
After you install it and you will see the following interface.

In the Input section, you can load the movie you want to convert and you can also add subtitle file and audio file

Step 3: Output
In this section you need to select a temporary path and a output directory.

Step 4: Video/Audio
If you want, you can change the setting in the video and audio section. But it is set to a good format by default anyway.
To add your movie file to the queue press the button “add” at the bottom and then you can click “run” to start the converting.

Step 5: Insert you SD Card and transfer the extracted Moonshell files and converted DPG video files from your computer to SD Card.

Part 2: How to convert movies to DPG with DPG Converter

You need to download Moonshell if you don't have it in your SD Card and Download the DPG Converter.


Step 1: Load files
Click “Add File” or “File”> “Add File” to load the video you want to convert.

Step 2: Choose profile and adjust settings
You can choose the output profile from a drop-down list “profile”. This powerful DPG Converter can not only convert videos to DPG format, but also can convert your videos to other formats, such as mp4, wmv, avi, mpeg, mov, mkv, flv, 3gp and other popular video format.
You can adjust the settings of the output video, you can adjust the Resolution, encoder, Bitrate, and other specific settings of the video and you can also save the setting as your own profile.
After everything is done, you can click the “Start” button and later you will get your DPG movie.

Tips: You can also do many video editing works with it:


1.Effect: You can adjust “Brightness”, “Saturation”, “Contrast” of the output video as you want

2.Trim: Tis function allows you to pick up one part of the video to convert. You can do it in 3 ways, a: set the exact start time and end time to trim b: click the “Trim From” and “Trim To” button when you preview the video c: drag the “trim bar” below the preview window and choose where to start and end.

3.Crop: You can use “crop” function to remove the black edges on your movie and you can also choose your play area. You can crop your video in 2 ways, a: drag the frame on the preview window b: set the exact crop value.

Part 3: How to convert movies to DPG with DPG Converter for Mac


Step 1: Load the video you want to convert by click “Add File”
Step 2: Choose output profile and adjust the setting of the output video
Step 3: Conversion. Click “Start” to begin the conversion.

Part 4: How to convert your DVD movies to DPG format.
Here you just need a DVD to DGP Converter.

Step 1: Load your DVD
Put your DVD to your DVD Drive and click “Load DVD”.

Step 2: Choose output profile
You can choose your output profile from a drop-down list “Profile” and also you can adjust the specific setting of the output DPG video, such as encoder, resolution, bitrate and so on.

Step 3: Edit Video
You can edit the effect of the output video including “Brightness”, “Saturation”, “Contrast” and so on.
Also you can “Trim”, “Crop”, “Merge” video according to your need.

Step 4: Conversion
After all the things done, you can click “Start” button to begin your conversion.

2010年4月11日星期日

How to convert MTS, TS, M2TS Video to HD video, MP4, WMV, AVI

Record everything around you and share with the world/friends/family is becoming more and more popular among young people. Get a HD Camcorder is necessary and also how to share is really important. I think you can use youtube.com, make a DVD and so on. As the video you record on your camcorder is MTS, TS, M2TS or other HD video format, so you have to convert them into normal video format to edit.

Today I will share with you how to convert MTS, TS, M2TS video to normal video formats.
You need 3 nice tool to do it: MTS Converter, TS Video Converter,
M2TS Converter.

Part 1: How to convert MTS video
Step 1: Load Video
Click “Add File” to load the video that you want.


Step 2: Choose Your Output Profile and Settings
From “Profile” drop-down list you can choose your output profile according to your need.
For example, if you have a iPod and you want to convert video for it, you need to choose “iPod” from the profile list and then it also provides the second chance to specify your iPod generation.
You can also click “setting”adjust the settings of your output video, such as “video/audio encoder”, “Video/audio Bitrate”, “Channels”, “Resolution” and so on..

Step 3: Video Editing
This powerful MTS Converter allows you to do many video editings.
1. Click "Effect" to make special effect for your movie.
You can adjust the “Brightness”, “Contrast”, “Saturation” and also you can use “deinterlacing” to improve you output effect.


2. Trim:
“Trim” function allows you to pick up any part of your video to convert. You can just convert a part of your video that you want.


3: Crop:
Cut off the black edges of the original movie video and watch in full screen on your iPod using the "Crop" function.


Step 4: Conversion
After you have done all the steps above you can click “Start” button to start your conversion.

Part 2: How to convert TS video


Step 1: Load Video
Click “Add File” to load the video that you want to convert.

Step 2: Choose Your Output Profile and Settings
From “Profile” drop-down list you can choose your output profile according to your need.
You can also click “setteing”adjust the settings of your output video, such as “video/audio encoder”, “Video/audio Bitrate”, “Channels”, “Resolution” and so on..

Step 3: Conversion
After you have done all the steps above you can click “Start” button to start your conversion.


Tips: Video Editing
This powerful TS Converter allows you to do many video editings.
1. Click "Effect" to make special effect for your movie.
You can adjust the “Brightness”, “Contrast”, “Saturation” and also you can use “deinterlacing” to improve you output effect.
2. Trim:
“Trim” function allows you to pick up any part of your video to convert. You can just convert a part of your video that you want.
3: Crop:
Cut off the black edges of the original movie video and watch in full screen on your iPod using the "Crop" function.

Part 3: How to convert M2TS video


Step 1: Add File
Load your M2TS video.

Step 2: Choose Profile and Settings
Select your output profile according your need and adjust the settings of your output video if you like.
(the default setting works well)

Step 3: Start Conversion
Click “Start” to begin your conversion.

2010年4月6日星期二

How to Easily Convert and Edit Video/Audio for Nexus One

What is Nexus One?
The Nexus One is a smartphone from Google, released on January 5, 2010. The phone is featured with the ability to transcribe voice to text, noise canceling dual microphones and GPS guided turn-by-turn voice directions to drives.

Besides features above, this version of the Nexus One can also hold video and audio. I feel most of users want to add moive video and music. But the not supported format is the problem. So Nexus One Converter was released closely following the Nexus One. It can easily convert popular video format, such as HD videos, SWF, FLV, VOB, MOD, MP4, H.264, M4V, AVI, WMV, 3GP, 3GPP, MOV, DivX, XviD, QuickTime Video, DV, MJPG, MJPEG, MPV, MPEG, MPEG2, MPG, etc. to formats (MP4, 3GP, AVC, AVI, MPEG-4, etc.) supported by Nexus One.

Next this article shows you how to use Aiseesoft Nexus One Video Converter.

Tips: How to effect, trim and crop the video to improve your output video quality.
After your Load your video you can click “Effect” button to access the editing panel.

1: Effect
Adjust the video effect as you want: Brightness, Contrast, Saturation and Deinterlacing.
2: Trim
Clip your video, pick up any part of your video to convert.
3: Crop
Adjust video size, Cut off the black edge of your video to let you enjoy your movie in full screen by click the 'Crop' button.
You can also select the aspect ratio from the Zoom Mode drop-down list. There are 4 choices for you: Full Screen, 16:9, 4:3 and Keep Original.

If you want a try, download and install Aiseesoft Nexus One Video Converter.

After you convert your videos you can put the video to your Nexus One.

2010年4月1日星期四

Full Guide: How to Enjoy Your Favorite DVD/ Videos on Your Portable Devices at Will

Questions
One: Do you still not to know how to rip DVD to the formats supported by your portable devices so you can enjoy DVD movies anywhere and at any time?
Two: Do you still not to know how to convert video from one popular video format to another?
Three: Do you still not to know how to backup things on your ipod to pc?

Now, it’s time to get rid of the problem. A professional Aiseesoft
DVD Converter Suite can help you solve all the problems.

DVD Converter Suite is the perfect combination of Aiseesoft DVD Ripper, Aiseesoft Video Converter and Aiseesoft iPod to Computer Transfer. With it, your can enjoy your DVD/ videos on your portable devices at will!

You can take the following step-by-step instructions to start your conversion.

Step 0: Download and install Aiseesoft DVD Converter Suite
After a short while, you can see the following interface:


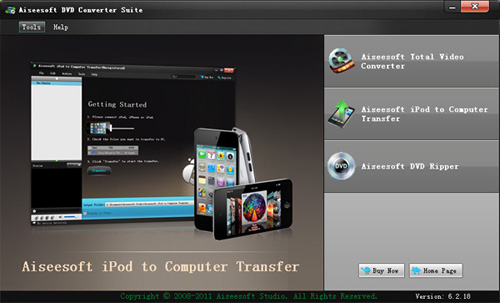
On the interface, you can see three buttons: DVD Ripper, Total Video Converter and iPod to Copputer Transfer. I’ll introduce them one by one.

Step Two:
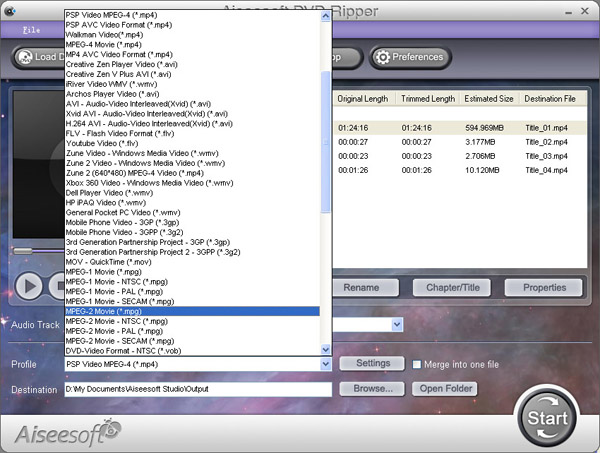
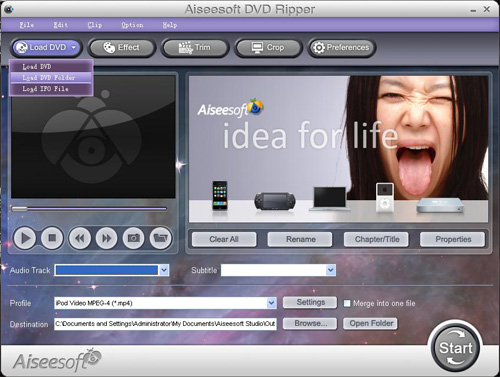
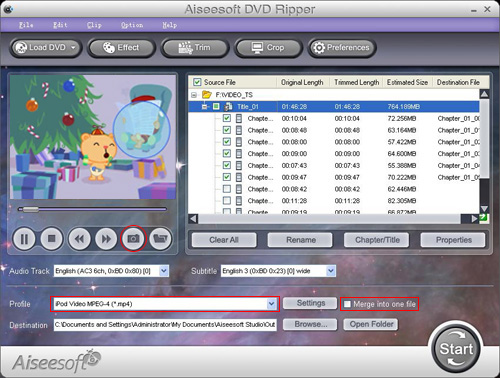
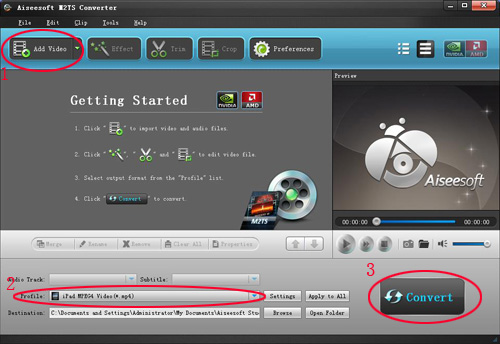
Click “DVD Ripper”, you can see the following interface:


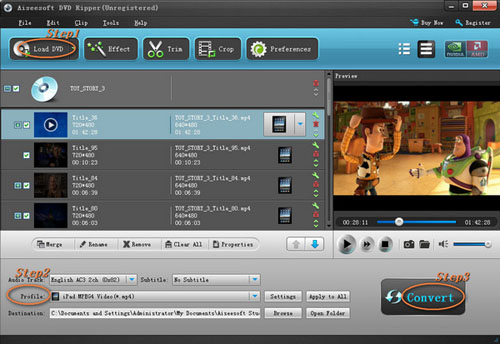
Then you can use it to rip DVD to the formats supported by your portable devices.
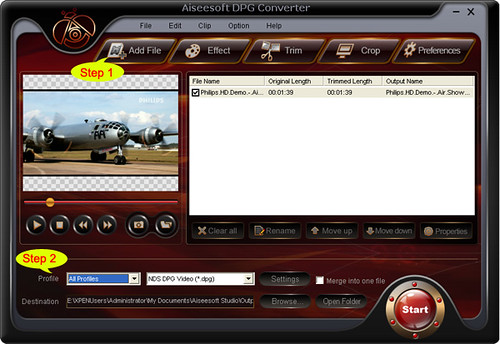
1. Import DVD
Place the DVD into your DVD drive and click the “Load DVD” button to load DVD.
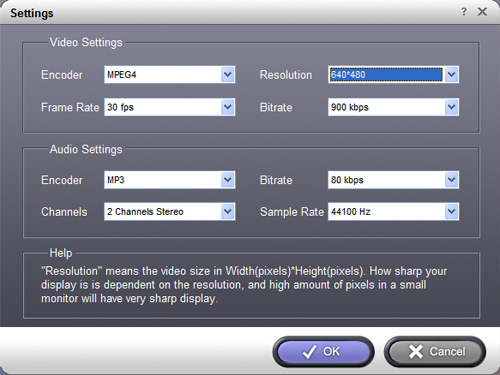
2. Set output format
Click "Profile" button to select the output format . You can click the "Settings" button to to set parameters of your output video such as Frame Rate, Resolution and Video Bitrate, etc.
3. Click the “Start” button.
If you want to your own conversion path, you could click “Browse” button to specify a location on your computer to save them. If you want to open the output folder, you can just click “Open”.
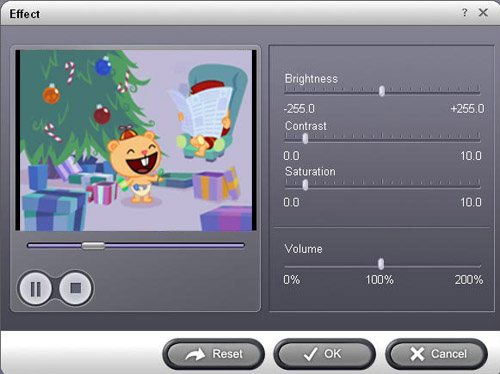
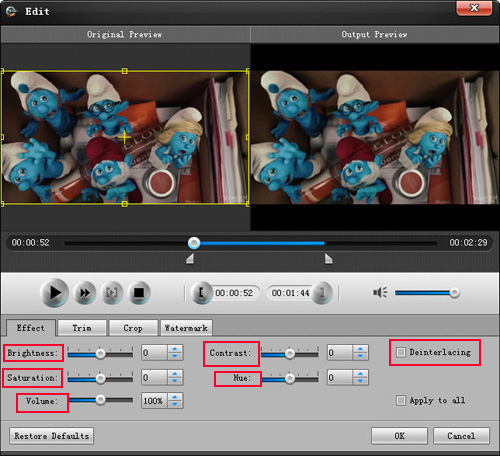
Tips
1. Click "Effect" to make special effect for your movie.
You can adjust Brightness, Contract, and Saturation of the movie, etc.
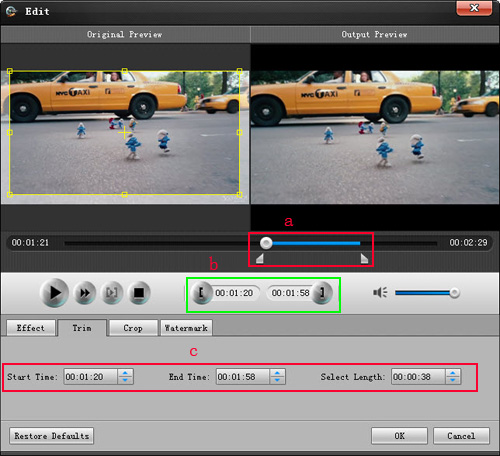
2."Trim" function is for you to select the clips you want to convert.
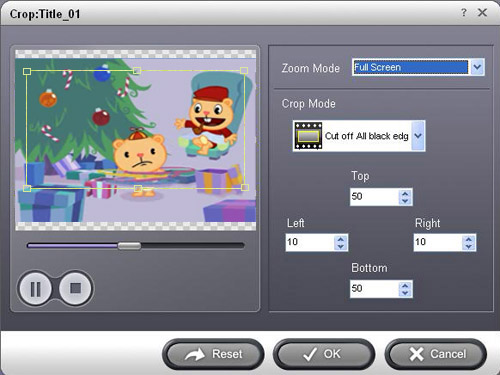
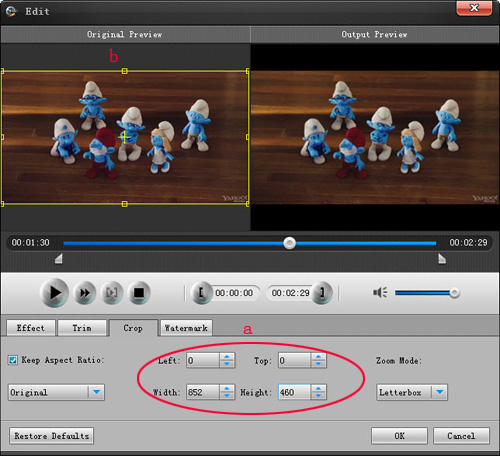
3. Cut off the black edges of the original movie video and watch in full screen on your iPod using the "Crop" function.
4. This software allows you to join several DVD chapters into one clips by using "Merge into one file".

Step Three:
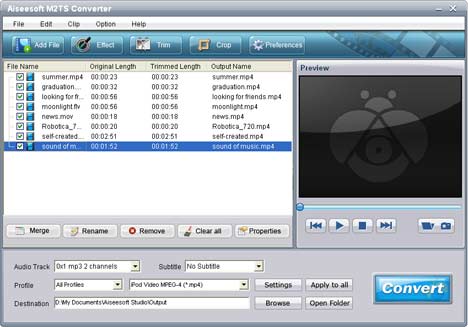
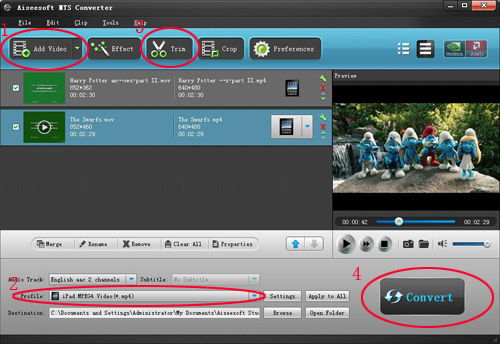
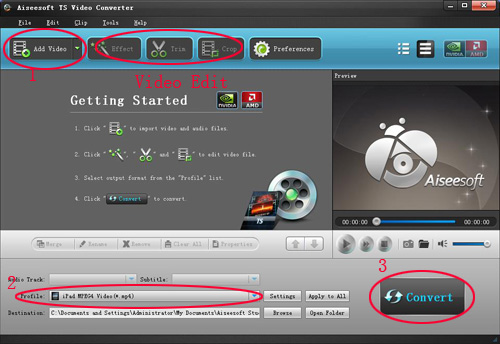
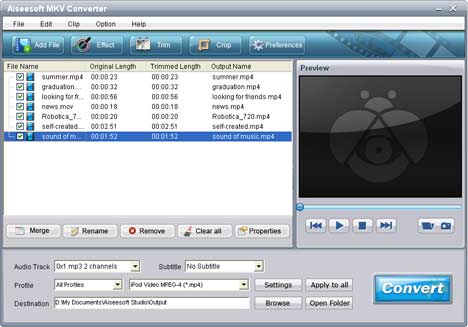
Click “Total Video Converter”, you can see the following interface:


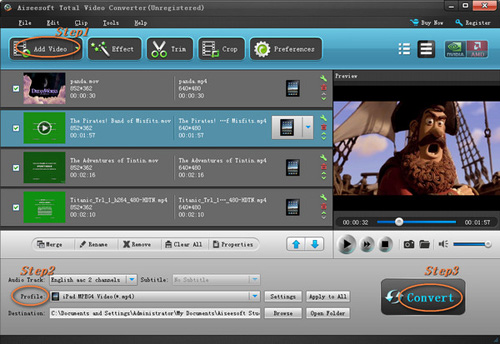
With it, you can convert video from one popular video format to another easily.
1. Click the "Add Files" button and add the video files you want to convert to the program.
2. Set output video format
Click "Profile" button to select the output format for your video. You can click the "Settings" button to to set parameters of your output video such as Frame Rate, Resolution and Video Bitrate, etc.
3. Click the “Start” button.
If you want to your own conversion path, you could click “Browse” button to specify a location on your computer to save the converted movie. If you want to open the output folder, you can just click “Open”.

Tips
Aiseesoft Total Video Converter also has functions of Trim, Crop, Snapshot and merge into one file.
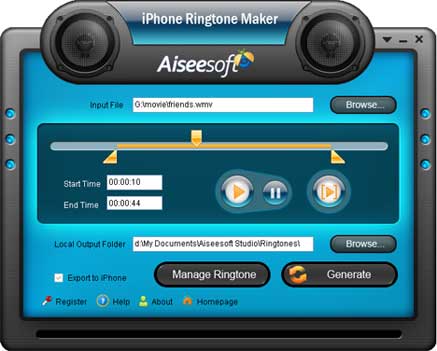
Step Four:

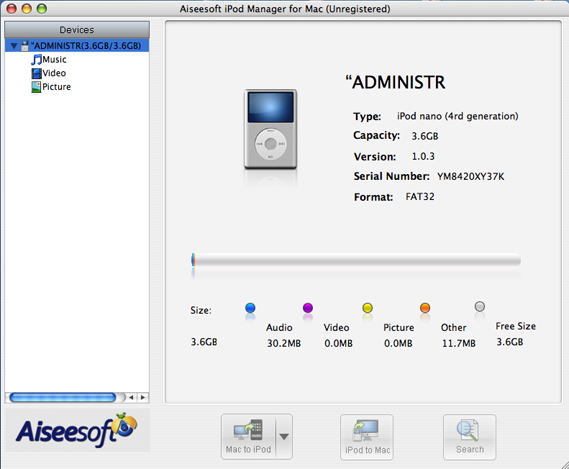
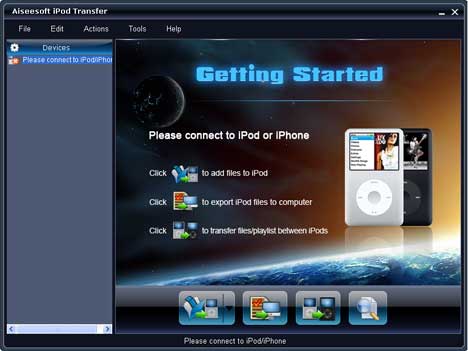
Click “iPod to Computer Transfer”, you can see the following interface:


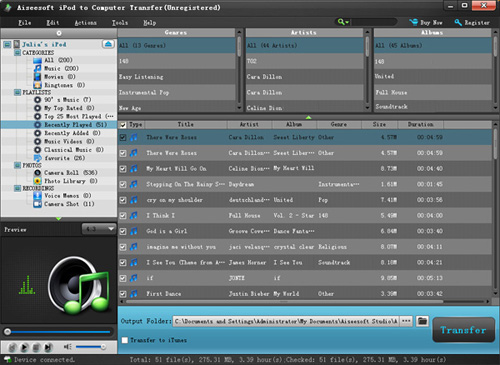
You can use it to backup iPod video/audio files to computer, you don’t need to worry about losing anything.
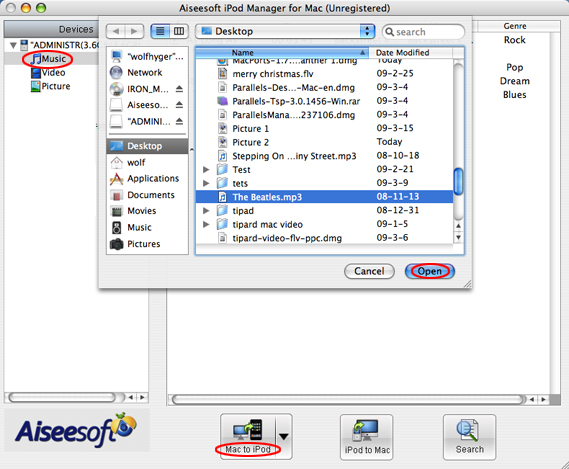
1. Connect your iPod to your computer
When you plug your iPod into your computer, Aiseesoft iPod to Computer Transfer can automatically load your iPod into it.
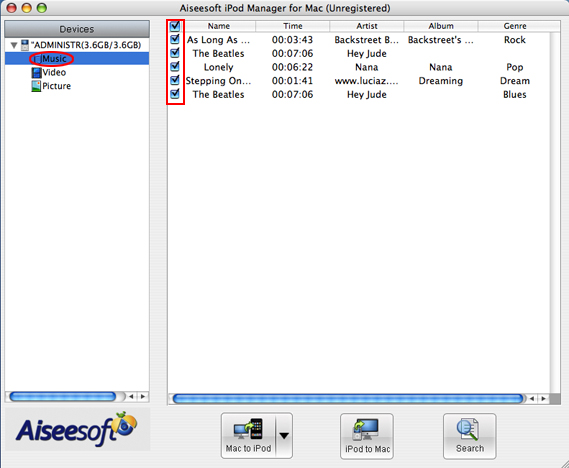
2. Choose files
Choose the songs, videos and other things that you want to backup at the top of the window
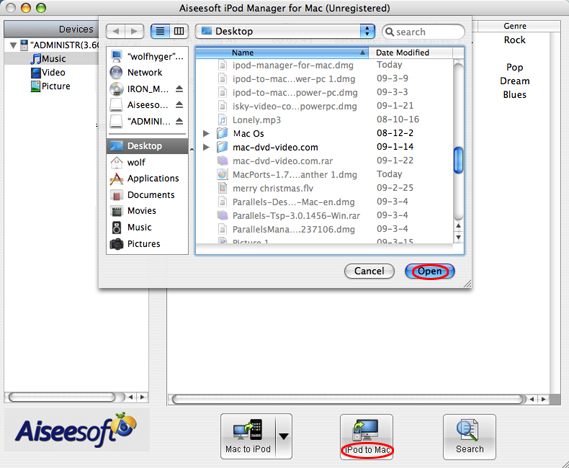
3. Start to transfer
The most important and the last thing you need to do are to click the “export to pc” button . After you click “export to pc” button a pop-up window will appear and with it you can choose where you place your iPod songs and videos. Few seconds later you will have your iPod songs, videos and other things on your computer.

Tips
1. To make your backup in a good order, you can click “Track Filter” button
2. For the beginner of iPod you can know the generation and name of your iPod from Aiseesoft iPod to Computer Transfer. And you can also know how many spaces have used and how many left in your iPod.
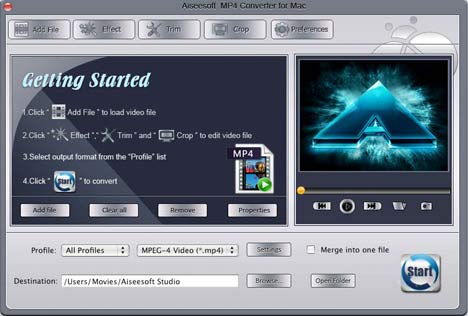
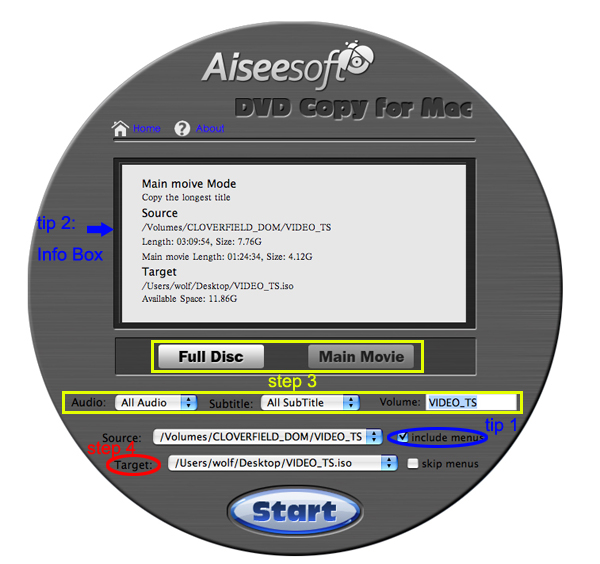
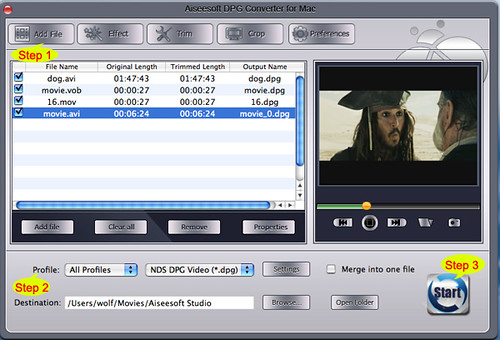

Mac user
Aiseesoft DVD Converter for Mac