2011年6月29日星期三

How to create iPhone ringtone with Aiseesoft iPhone Ringtone Maker

You bought an iPhone and love all its features, but wish you didn't have to pay for your songs twice to get a ringtone. (We know that iPhone, iPhone 3G Ringtones use the file extension .M4R. And the users must pay $2 for a piece of song through Apple iTunes store). There are plenty of songs in your music library, but no way to make ringtones from any of them. Rihgt?

Actually, with a little bit of trickery (nothing illegal) you can create ringtones from any one of your non-DRM songs.

This works on both Mac and Windows PCs.

Window Users
You can create free iPhone Ringtones by yourself with Aiseesoft iPhone Ringtone Maker.

You can take the following step-by-step instructions to start.

Step 0: Download and install Aiseesoft iPhone Ringtone Maker. After a short while, you can see the following interface:


Step 1: Click “Browse” on the right side of "Input File" to import the file that you want to make ringtone from it.
Step 2: Play it and listen the music to find the segment that you want to use it as ringtone. Then drag and click the start & end slider to set your wanted segment, or type the start & end time in the corresponding text box directly to get the exact segment. You also can pre-listen the converted audio before generate.
Step 3: Click “Browse” on the right side of "Local Output Folder" to choose the output destination.
Step 4: Check "Export to iPhone" option, the converted ringtone will be load to your iPhone directly.
Step 5: After all the settings are finished, click “Generate” to begin making your own iPhone ringtone.

Key function
● Convert any video to iPhone ringtone M4R
● Create iPhone ringtone from any audio files
● Get any clips from video and audio
Edit Added iPhone ringtones
Using Aiseesoft iPhone Ringtone Maker, you are free to edit the added iPhone ringtone by removing it or renaming it directly.

For Mac Userd, please go to Aiseesoft
iPhone Ringtone Maker for Mac

2011年6月28日星期二

How to Rip Blu-Ray DVD and Common DVD to iPad/iPhone/iPod

Blu-ray DVD is more and more popular among us since the images on Blu-ray disc are sharper, brighter, and more detailed than any DVD movie. What manufacturers are trying to do is to make the movie look as close to what you see in a real theater as possible.
It is a great choice to put Blu-ray DVD to iPad/iPhone/iPad. Aiseesoft Blu-Ray to iPad Ripper is the professional software that can rip Blu-ray DVD, common DVD and convert video to iPad/iPhone/iPod with good output quality, easily and fast.
How to Rip Blu-Ray DVD to iPad Format?

Tools you need:
1. Blu-Ray DVD Driver
2.Blu Ray to iPad Ripper
Preparation:
You need install and run this Blu-Ray to iPad Ripper


Step 1: Load your BD
Load your BD disc in to your Blu-ray driver.
Step 2: Output Profile
Choose your output profile from the drop-down list according to your need. You choose output format as your devices and also with specific video format.
You can also set the specific settings of your output video, such as “resolution” “video bitrates” “encoder” and so on.

After you have done all the tings above, you need to click the start button to convert your Blu-ray disc.

Tips:
You can also do many video editing works about your output video.

1. Effect:
You can adjust the “Brightness”, “Contrast”, “Saturation” of your output video and also you can select to use the “deinterlacing” function which make your video more enjoyable.
2. Trim
To pick up any part of your BD movie to converter, you can use “Trim” function.
3. Crop
You can choose any play area to convert by using the Crop function.
4. Watermark
You can add your own watermark on the output video, the watermark can be words and also picture. You can choose the font of your words and other really enjoyable function.

2011年6月26日星期日

Full Guide: How to Convert DVD to MP4, AVI, 3GP, iPod ......

DVD is the first choice for many people when they want to watch movies at home. It has high quality picture, different subtitles and audio tracks and most important, some of the DVD movies are more enjoyable than than the cinema one.
However, when we travel, when the disc is broken, when we want to backup the DVD movies, when we want to share the movies with friends, when we want to make usage of the movie, what should we do?
Convert DVD to video video formats you need.

This guide aims to show you how to convert DVD to different video format both for windows/mac users.

Part 1: How to Convert DVD on Windows with DVD Ripper


Step 1: Load DVD
Put your DVD to your DVD Drive and click “Load DVD” button to add your DVD
Step 2: Choose Profile
Choose your output video profile from a drop-down list.
Step 3: Start Conversion

Part 2: How to Convert DVD on Mac with DVD Ripper for Mac


Step 1: Load DVD
Click the “Load DVD” button, find the DVD folder of the movie you want to add from your DVD-ROM, and Click “Open”.
Step 2: Choose output profile and settings
Selecting output format is really easy, you can chose your output format according to your devices players and the default setting works great.
For a veteran of digital player, you could customize your own settings by clicking “Settings” button to chose your own video resolution, frame rate, bit rate, encoder, etc.
Step 3: Start Conversion

If you want to convert both DVD and videos, here is a really powerful DVD Converter Suite . It can help you to convert DVD and videos easily. It can also help you to backup the iPod music and videos to your computer.

2011年6月24日星期五

How to Rip DVD and Convert Video for Your iPad On Windows/Mac

Aiseesoft iPad Converter Suite is newly released software for iPad fans. It can rip any DVD files (DVD-Video, DVD folder and DVD IFO file) to iPad, convert all popular videos/audios to iPad formats and transfer files from PC to iPad, from iPad to PC and from iPad to iPad. It works similar to iTunes. So why do you always buy movies and songs from iTunes with extra money? It can help you make use of your resources.
The product is very easy in use. You just need download, install and run the trial version.


The product is multifunctional. It can trim, crop, edit video effect, merge, add text and image watermark, select audio track and subtitle, adjust video settings and snapshot.

If you are Mac user, you can choose Aiseesoft iPad Converter Suite for Mac .

2011年6月23日星期四

How to convert mod to wmv/avi/mp4/mov/mpg for Mac/Windows

Nowdays, more and more people use camcorder to record something happy, such as birthday party, wedding, graduation etc. While, maybe lots of you aren’t familiar with these tools, feeling frustrated about how to convert and import properly those .MOD video files. Now here, I give some little tips and hope it useful to all of you.

First, what’s Mod?

.Mod files are actually MPEG-2 files with AC3 audio, similar to a VOB file on a DVD or the M2T files used on Sony hard drive camcorders, this video file format is used on many digital camcorders, such as the JVC Everio, the Canon FS100 and the Panasonic D-Snap SD-card camcorders.

Second, why and how we convert them to what we wanted video formats?

Because .Mod file is not supported by iPod Touch, iPod Nano, iPod Classic, iPhone, Apple TV, PSP, Zune, Creative Zen etc, so if you want to import MOD files from your camcorders to play on iPod, even burn to DVD to keep them, you have to convert them.
Here, I’ll share you with a useful tool to solve this problem.
Part one: For Mac users:

Aiseesoft Mod Converter for Mac can help you convert Panasonic/JVC/Cannon etc. Mod file to AVI, convert Mod to FLV, MPG, MP4, MOV, FLV, 3GP, etc., then you can enjoy edit them, enjoy them on your portable devices.

Now, follow the step-by-step guide and start the conversion.

Step 0: Download, install and run Aiseesoft Mod Converter for Mac
And after a while, you can see the following inferface:


Step 1: Load Video:
Click “Add File” button to browse your computer hard disc and load the MOD/TOD video files you want to convert to the software

Step 2: Set output video format
Click “Profile” button from the drop-down list to select the output video format such as AVI, MPG, MPEG and WMV. You can click the “Settings” button to set parameters of your output video such as Frame Rate, Bitrate to get the best video quality as you want.

Step 3: Click the “Start” button to start the conversion.

Tips:
This Mac Mod Converter also provides you with a series of video editing functions, such as crop video size, trim a clip of video, and merge several videos, set video effect.

1. Click "Effect" to make special effect for your movie.

You can adjust the “Brightness”, “Contrast”, “Saturation” and also you can use “deinterlacing” to improve you output effect.

2. Trim:
“Trim” function allows you to pick up any part of your video to convert. You can just convert a part of your video that you want.

3: Crop:
Cut off the black edges of the original movie video and watch in full screen on your iPod using the "Crop" function.

4. Merge into one file
If you want to merge several Mod/Tod videos into one file you can choose them and click the “Merge into one file” to do it

Part two: For windows users:

Aiseesoft Mod Converter has the same function

Step 0: Download, install and run Aiseesoft Mod Converter


Step 1: Click “Add File” button to add your video files
Step 2: Set output video format
Step 3: Click the “Start” button to start the conversion.


Tips:
This powerful Mod Converter also allows you to do many editing works, such as “Trim”, “Crop” and “Effect”

After you convert MOD/TOD Video files with Aiseesoft Mod Converter, you can import MOD Movie from your camcorders to Windows Movie Maker, iPod, Zune, etc without problem.

2011年6月22日星期三

How to Copy DVD, Rip DVD, Convert Video on Mac

Many friends want to share their home-make DVDs and their DVD movies with others and also they always feel difficult to do that. Today I will share you a really easy way to Copy DVD to another DVD disc, DVD image ISO, or a DVD folder. Also I will also introduce you how to rip DVD and convert videos on Mac.

Part 1: How to copy a DVD to another DVD disc/DVD image ISO/DVD folder on Mac
Step 1: DVD Copy for Mac.
To copy a DVD on Mac, you need a DVD Copy for Mac to help you. Aiseesoft DVD Copy for Mac is a good choice.


Step 2: Load Your Source
This excellent DVD copy for Mac allows you to load DVD folder and DVD image ISO.

Step 3: Choose Output Info
1. “Full Disc” or “Main Movie”
This DVD copy for Mac enables you to copy the full disc and also the main movie according to your need.

2. “Audio”, “Subtitle” and “Volume” name
You can choose your output audio from the “Audio” drop-down list, such as “all audio”/ “None”/ or some audio the DVD provide.

Subtitle is always an important thing, you can choose your output subtitle in “Subtitle” drop-down list.

You can also name your output volume's name

Step 4: Choose Your Target
You can copy your DVD to another DVD disc, DVD folder or DVD image ISO.

Tips:
1. You can also choose to copy the menus or not.
2. All the info you choose will be dispalyed on the “Info Box”.

Part 2: How to rip DVD to video formats on Mac

Step 1: Download Aiseesoft DVD Ripper for Mac

Step 2. Load DVD
Insert DVD into your DVD-ROM, run DVD Ripper for Mac, click “Load DVD”, find the DVD folder of the movie you want to add from your DVD-ROM, and Click “Open”.


Step 3. Set output format.
This best DVD ripper for Mac provides you output formats as many as you want. Just choose one from the drop down list “profile” according to your portable player.

Step 4: Conversion
You can just Click “Start” to begin your conversion.

Part 3: How to Convert Video files on Mac

Step 1: Download Aiseesoft Video Converter for Mac


Step 2: Load video
Easily click “Add File” to load your video that you want to convert.

Step 3: Choose output profile and settings
At the bottom of the interface there are a drop-download list named “profile”. You can choose your output format here.

Tips:
1. Trim
If you want to pick up a part of the video to convert, please click “Trim” button and drag the “Start trim slider” to set the start time and “End trim slider” to set the end time. (a) You can also do that by clicking the “Start trim button” and “End trim button” (b). The third way you do that is set the exact Start/End time at the right of the pop-up window and click “OK”.(c)

2. Crop
If you want to remove the black edges or you want to convert a certain area of your video, please click the “Crop” button. You can do this either by drag the frame around the movie (a) or set the crop value: “Top, Left, Bottom, Right”.(b). Another way to do that is choose models from “Crop Mode”(c).
Aiseesoft Video Converter for Mac also allows you to chose the output aspect ratio above the crop pane, “Keep Original, full screen, 16:9 and 4:3” are available.

3. Effect
If you want to adjust the effect of your movie, please click the “Effect” button and a pop-up effect window will appear. It allows you to edit your movie’s effect including “Brightness, Contrast, Hue, Saturation and Volume”.

2011年6月21日星期二

Aiseesoft Blu-ray Ripper: the Best Assistant Tool to All Android Tablets

According to a leaked company presentation, Lenovo is planning to release a ThinkPad tablet this July. The ThinkPad tablet will run Android 3.0 and be equipped with a 10.1-inch 1280 x 800 IPS capacitive multi-touch panel, a 1GHz Tegra 2 dual core processor, 16GB to 64GB of storage, front and rear cameras, and up to 8 hours of purported battery life. And it is about 14mm thick and weighs 1.6 pounds. To provide users with business-friendly features, this tablet has optional pen input as well as a portfolio case with a built-in keyboard, allowing you to use the tablet like a laptop.

Apple iPad creates an era of tablet computer. And numerous Android tablets flood the market, such as Samsung Galaxy Tab, Motorola Xoom, etc. To satisfy great demand on enjoying Blu-ray/DVD movie on Android tablets, Aiseesoft optimizes our Blu-ray Ripper to support all popular Android tablets.

Aiseesoft Blu-ray Ripper is professional Blu-ray ripping software to help users rip any Blu-ray movie to all popular video and audio formats. This Blu-ray Ripper can help you remove DRM protection (AACS, BD+, ROM Mark and MKB V23) from your Blu-ray Disc. With it, you can conveniently convert the BD movie to Android compatible formats. Besides of Blu-ray, this Blu-ray Converter also supports converting DVD movie and popular video files.

To provide users with the customized output video, this software possesses powerful video editing functions. For instance, you can trim and convert a specified video segment to Android tablet, crop video playing area, watermark video, join video clips together, and modify video brightness, saturation and contrast.

To sum up, Aiseesoft Blu-ray Ripper can help you convert any Blu-ray, DVD and video files to Android tablet with perfect output quality and amazing converting speed. For more information, please visit its homepage.

2011年6月20日星期一

How to Rip DVD(windows/mac), Copy DVD, Convert Video?

Every year, my family will have a big party and all the members will get together. We have a very nice time on each year's party. And from the year 2000, I record the party and share with my family. I enjoy the work very much, while when I share the video or the DVD, it is really a big problem. But now I can solve it with only a few clicks.

So I write this article to show you guys how to deal with dvd and video stuff.

Part 1: How to Rip DVD on Windows and Mac

First Let me explain what is rip DVD. When I talk about “Rip DVD”, it means I will convert DVD video/movie to video format and you can play the video/movie without the disc. Of course, the original DVD will not be hurt.

For Windows users:
You need a DVD Ripper.


Step 1: Load your DVD to it
Step 2: Choose output profile
Step 3: Start Conversion


For Mac users:
Step 1: Download DVD Ripper for Mac.


Step 2: Load you DVD
Step 3: Choose output profile
Step 4: Start Conversion


Part 2: How to Copy DVD video/movie to another DVD Disc
To Copy a DVD to a blank DVD Disc you need a DVD copy Software and a DVD +/- RW Drive and a blank DVD Disc.

Step 1. Choose Source:
The source of this DVD Copy software can be: DVD disc, ISO image file and DVD folder
Step 2. Preparation
Before you click the “Start” button,
1. You can choose to copy the full disc or the main movie.
2. You can choose the audio, subtitle of the copy.
3. You can change the name of the volume.
4. You can choose to “include menu” or “skip menu” or neither of them.
Step 3. Choose Target:
You can copy your source to 3 target: DVD disc, ISO image and DVD folder
Step 4: Start Copy

Part 3: How to Convert Video
Here you need a Video Converter to help you.

Step 1: Add Video
Step 2: Choose output profile
Step 3: Start Conversion

2011年6月16日星期四

Best Way to Share Your iPod/iPhone Files

iPod/iPhone have become an irreplaceable assistant of our daily life. While I have to say, compared to other portable device, iPod/iPhone also have some inconvenience, such as
Can't directly backup your video/ audio files to computer to avoid your files lost;
Can't share music and videos with your friends and family at will;
Have to use iTunes to add music and videos into your iPod/iPhone. Etc

So, here I will share some several useful tools to solve all your problems in this article.

Part one: solve the three problems with one tool-- Aiseesoft iPod Transfer
This Powerful iPod transfer can help you to backup files from iPod to PC , transfer files from one iPod to another one directly, and import video, audio files or folders from PC to iPod without iTunes,. And it supports all model of iPod and provides lifetime upgrade for free.
Free download it and have a try, it is totally clean- no adware/spyware/virus.


First usage: Import video and audio files or folders from Computer to iPod without iTunes
Step 1: Run the software, and connect your iPod/iPhone to your computer via USB cable.
Step 2: Click "Button 1" to seek the files or folders that you want to import to iPod and click OK.The process of importing will be finished instantly.

Second usage: Backup your iPod/iPhone files to your computer.
Step 1: Run the software, and connect your iPod/iPhone to your computer via USB cable.
Step 2: Open the library/playlist that you want to export files, and then check the file(s) you want to export in the file list.
Step 3: Click "Button 2" to select the destination of the exporting files and start exporting files.

Third usage: Transfer files from one iPod to another iPod
Step 1: Run the software, and connect two iPod/iPhone to your computer via USB cable.
Step 2: Open the library/playlist that you want to export files. Pick the files that you need to transfer.
Step 3: Click "Button 3", it will show you the folder of another iPod that you want to transfer to. Click OK. The transfer can be finished automatically.
If you are mac user, you can visit Aiseesoft iPod Manager for Mac

Part Two: Just need backup video/ audio files to computer to avoid your files lost
You can have a look Aiseesoft iPod to Computer Transfer


It can backup iPod video/audio files to computer, you don’t need to worry about losing
anything.
Step 1: Connect your iPod to your computer
Step 2: Choose files
Choose the songs, videos and other things that you want to backup at the top of the window
Step 3: Start to transfer
The most important and the last thing you need to do are to click the “export to pc” button .After
you click “export to pc” button a pop-up window will appear and with it you can choose where
you place your iPod songs and videos. Few seconds later you will have your iPod songs, videos
and other things on your computer.
If you are mac user, you can visit Aiseesoft iPod to Mac Transfer

Part Three: If you are iPhone user, share two similar tools for you: Aiseesoft iPhone Transfer, which can import video and audio files on PC to iPhone directly without iTunes. Backup files from iPhone to local disk without loss. Transfer files between two different iPhone.
and Aiseesoft iPhone to Computer Transfer.

2011年6月15日星期三

How to Copy DVD, Rip DVD, Convert Video on Mac

Many friends want to share their home-make DVDs and their DVD movies with others and also they always feel difficult to do that. Today I will share you a really easy way to Copy DVD to another DVD disc, DVD image ISO, or a DVD folder. Also I will also introduce you how to rip DVD and convert videos on Mac.

Part 1: How to copy a DVD to another DVD disc/DVD image ISO/DVD folder on Mac
Step 1: DVD Copy for Mac.
To copy a DVD on Mac, you need a DVD Copy for Mac to help you. Aiseesoft DVD Copy for Mac is a good choice.


Step 2: Load Your Source
This excellent DVD copy for Mac allows you to load DVD folder and DVD image ISO.

Step 3: Choose Output Info
1. “Full Disc” or “Main Movie”
This DVD copy for Mac enables you to copy the full disc and also the main movie according to your need.

2. “Audio”, “Subtitle” and “Volume” name
You can choose your output audio from the “Audio” drop-down list, such as “all audio”/ “None”/ or some audio the DVD provide.

Subtitle is always an important thing, you can choose your output subtitle in “Subtitle” drop-down list.

You can also name your output volume's name

Step 4: Choose Your Target
You can copy your DVD to another DVD disc, DVD folder or DVD image ISO.

Tips:
1. You can also choose to copy the menus or not.
2. All the info you choose will be dispalyed on the “Info Box”.

Part 2: How to rip DVD to video formats on Mac

Step 1: Download Aiseesoft DVD Ripper for Mac

Step 2. Load DVD
Insert DVD into your DVD-ROM, run DVD Ripper for Mac, click “Load DVD”, find the DVD folder of the movie you want to add from your DVD-ROM, and Click “Open”.


Step 3. Set output format.
This best DVD ripper for Mac provides you output formats as many as you want. Just choose one from the drop down list “profile” according to your portable player.

Step 4: Conversion
You can just Click “Start” to begin your conversion.

Part 3: How to Convert Video files on Mac

Step 1: Download Aiseesoft Video Converter for Mac


Step 2: Load video
Easily click “Add File” to load your video that you want to convert.

Step 3: Choose output profile and settings
At the bottom of the interface there are a drop-download list named “profile”. You can choose your output format here.

Tips:
1. Trim
If you want to pick up a part of the video to convert, please click “Trim” button and drag the “Start trim slider” to set the start time and “End trim slider” to set the end time. (a) You can also do that by clicking the “Start trim button” and “End trim button” (b). The third way you do that is set the exact Start/End time at the right of the pop-up window and click “OK”.(c)


2. Crop
If you want to remove the black edges or you want to convert a certain area of your video, please click the “Crop” button. You can do this either by drag the frame around the movie (a) or set the crop value: “Top, Left, Bottom, Right”.(b). Another way to do that is choose models from “Crop Mode”(c).
Aiseesoft Video Converter for Mac also allows you to chose the output aspect ratio above the crop pane, “Keep Original, full screen, 16:9 and 4:3” are available.

3. Effect
If you want to adjust the effect of your movie, please click the “Effect” button and a pop-up effect window will appear. It allows you to edit your movie’s effect including “Brightness, Contrast, Hue, Saturation and Volume”.

2011年6月14日星期二

How to Rip DVD and Convert Video for Your iPad On Windows/Mac

Aiseesoft iPad Converter Suite is newly released software for iPad fans. It can rip any DVD files (DVD-Video, DVD folder and DVD IFO file) to iPad, convert all popular videos/audios to iPad formats and transfer files from PC to iPad, from iPad to PC and from iPad to iPad. It works similar to iTunes. So why do you always buy movies and songs from iTunes with extra money? It can help you make use of your resources.
The product is very easy in use. You just need download, install and run the trial version.


The product is multifunctional. It can trim, crop, edit video effect, merge, add text and image watermark, select audio track and subtitle, adjust video settings and snapshot.

If you are Mac user, you can choose Aiseesoft iPad Converter Suite for Mac .

2011年6月13日星期一

How to convert video to iPad 2

With Aiseesoft iPad 2 Video Converter, users can enjoy any video files on iPad 2 through converting it to iPad 2 compatible video and audio formats. This iPad 2 Video Converter is able to convert most popular video formats to iPad 2. Also this software owns powerful video editing functions to help users customize video effect.

Step 1: Download iPad 2 Video Converter and install it

You could download the latest version of this iPad 2 Video Converter by clicking here. You can double-click the installation package to install it. After running this software, you can see the interface like this:


Step 2: Input source video file

This iPad 2 Video Converter supports most popular video formats. You can input any video file by clicking the "Add File" button.

Step 3: Customize video effect

Aiseesoft iPad 2 Video Converter provides users with powerful video editing functions. With it, users can conveniently trim video length, crop video frame, modify video effect, etc. All these settings can be finished in the "Edit" interface.

Step 4: Choose audio track and subtitle

This iPad 2 Video Converter will list all audio tracks and subtitles available on the source video file. You can choose your preferred one for the output iPad 2 file.

Step 5: Choose profile

Aiseesoft iPad 2 Video Converter can convert video to iPad 2 MPEG-4 video, iPad 2 H.264 video and iPad 2 H.264 720p video for TV. You can choose any one according to your need. And you can do some further settings by clicking the "Settings" button.

Then you can press the "Convert" button to start converting video to iPad 2.

2011年6月12日星期日

How to Convert DVD and Video to Your Fashionable iPad

iPad has been released for about a month, but it is pretty popular among people. I think you guys who got iPad are very proud. How do you make full use of its great space without spending extra money? Show it off before friends? It is the best choice to use DVD collection and video you have. But how do you deal with it?
Recently I got the information from internet. I feel it is useful for all, so I’d like to share it with you guys. It is third-party software that can rip DVD and convert video for iPad. And the whole process is so easy. They are Aiseesoft DVD to iPad Converter and Aiseesoft iPad Video Converter.

Next it is divided into two parts to describe it in details.
Part One: How to Rip DVD to iPad.
Firstly you need download the software: Aiseesoft DVD to iPad Converter. And then install and run DVD to iPad Converter.
The specific operating steps as follows:


Step 1: Load DVD.
Click "Load DVD" to add your DVD contents.
Step 2: Set output video format.
Click "Profile" button from the drop-down list to select the exact output video format that is the most suitable for your iPad. You can click the "Settings" button to set parameters of your output video such as such as Resolution, Video Bitrate, Frame Rate, Audio Channels, Sample Rate, etc. to get the best video quality as you want.
Step 3: Select the output path by clicking “Browse” button from the line of destination.
Step 4: Click the "Start" button to start the conversion.

Part Two: How to Convert Video to iPad.

Also it is the same. Firstly download the software: Aiseesoft iPad Video Converter. And then install and run iPad Video Converter.

The specific operating steps as follows:


Step 1: Add video.
Click "Add Video" to add your video contents.
Step 2: Set output video format.
Click "Profile" button from the drop-down list to select the exact output video format that is the most suitable for your iPad. You can click the "Settings" button to set parameters of your output video such as such as Resolution, Video Bitrate, Frame Rate, Audio Channels, Sample Rate, etc. to get the best video quality as you want.
Step 3: Select the output path by clicking "Browse" button from the line of destination.
Step 4: Click the "Start" button to start the conversion.

Tips:
The two pieces of software have some basically editing functions such as trim, crop, effect,
1. Trim:
Three ways to do trim:
a. Drag the “start scissors bar” button to where you want to start and “end scissors bar” button where you want to end. (1)
b. You can click the “Trim From” button when you want to start the trim during your preview and click “Trim To” button when you want to end.
c. Set the exact “start time” and “end time” at right part of the trim window and click “ok”.

2. Crop:
Three ways to do crop
a. Select one crop mode from the "Crop Mode" drop-list.
b. Dragging crop frame to choose your own crop.
c. Set your own crop value.

3. Effect
Drag the adjustment bar to find your favorite effect of Brightness, Contrast, Saturation and Volume.

4. Merge into one file.
Pick the "Merge into one file" to merge the files you choose into one output file. (2)

There is another piece of software named iPad Converter Suite. It includes DVD to iPad Converter, iPad Video Converter and iPad Transfer.

2011年6月9日星期四

How to Copy DVD, Rip DVD, Convert Video on Mac

Many friends want to share their home-make DVDs and their DVD movies with others and also they always feel difficult to do that. Today I will share you a really easy way to Copy DVD to another DVD disc, DVD image ISO, or a DVD folder. Also I will also introduce you how to rip DVD and convert videos on Mac.

Part 1: How to copy a DVD to another DVD disc/DVD image ISO/DVD folder on Mac
Step 1: DVD Copy for Mac.
To copy a DVD on Mac, you need a DVD Copy for Mac to help you. Aiseesoft DVD Copy for Mac is a good choice.


Step 2: Load Your Source
This excellent DVD copy for Mac allows you to load DVD folder and DVD image ISO.

Step 3: Choose Output Info
1. “Full Disc” or “Main Movie”
This DVD copy for Mac enables you to copy the full disc and also the main movie according to your need.

2. “Audio”, “Subtitle” and “Volume” name
You can choose your output audio from the “Audio” drop-down list, such as “all audio”/ “None”/ or some audio the DVD provide.

Subtitle is always an important thing, you can choose your output subtitle in “Subtitle” drop-down list.

You can also name your output volume's name

Step 4: Choose Your Target
You can copy your DVD to another DVD disc, DVD folder or DVD image ISO.

Tips:
1. You can also choose to copy the menus or not.
2. All the info you choose will be dispalyed on the “Info Box”.

Part 2: How to rip DVD to video formats on Mac

Step 1: Download Aiseesoft DVD Ripper for Mac

Step 2. Load DVD
Insert DVD into your DVD-ROM, run DVD Ripper for Mac, click “Load DVD”, find the DVD folder of the movie you want to add from your DVD-ROM, and Click “Open”.


Step 3. Set output format.
This best DVD ripper for Mac provides you output formats as many as you want. Just choose one from the drop down list “profile” according to your portable player.

Step 4: Conversion
You can just Click “Start” to begin your conversion.

Part 3: How to Convert Video files on Mac

Step 1: Download Aiseesoft Video Converter for Mac


Step 2: Load video
Easily click “Add File” to load your video that you want to convert.

Step 3: Choose output profile and settings
At the bottom of the interface there are a drop-download list named “profile”. You can choose your output format here.

Tips:
1. Trim
If you want to pick up a part of the video to convert, please click “Trim” button and drag the “Start trim slider” to set the start time and “End trim slider” to set the end time. (a) You can also do that by clicking the “Start trim button” and “End trim button” (b). The third way you do that is set the exact Start/End time at the right of the pop-up window and click “OK”.(c)

2. Crop
If you want to remove the black edges or you want to convert a certain area of your video, please click the “Crop” button. You can do this either by drag the frame around the movie (a) or set the crop value: “Top, Left, Bottom, Right”.(b). Another way to do that is choose models from “Crop Mode”(c).
Aiseesoft Video Converter for Mac also allows you to chose the output aspect ratio above the crop pane, “Keep Original, full screen, 16:9 and 4:3” are available.

3. Effect
If you want to adjust the effect of your movie, please click the “Effect” button and a pop-up effect window will appear. It allows you to edit your movie’s effect including “Brightness, Contrast, Hue, Saturation and Volume”.

2011年6月7日星期二

How to convert HD video to MP4/YouTube/MPEG video

Maybe some people will ask: what is HD video and why it can be widely used?
Answer:
High-definition video or HD video refers to any video system of higher resolution than standard-definition (SD) video, and most commonly involves display resolutions of 1280×720 pixels (720p) or 1920×1080 pixels (1080i/1080p).
Nowdays, HD is becoming more and more popular as the following reasons:
1.HD DVDS, together with equipment to play and record them, are available now, stimulating the public appetite for HD.
2.PC displays with HD quality potential are becoming widely used, which will acclimatise the public to HD.
3.Large flat LCD screen with HD resolution are becoming readily available at prices which the public seems prepares to pay, providing the means to view HD.

While, HD video also has some inconvenience to use, such as, we can’t edit them
in Windows Movie Maker or some other edit software; can’t put them into portable devices directly , like iPod, iPhone, Zune, Creative Zen and so on; can’t share videos with friends on youtube, myspace and other online video website. etc.

Here, I’ll introduce a wonferful tool to solve this problem.
Aiseesoft HD Converter has three uses:
Convert HD video to general video;
Convert general video to HD video;
Convert among HD videos.

So with it, you can enjoy HD video at will.

The following is a simple guide for you:
Step 0: Download, install and run Aiseesoft HD Video Converter.


Step 1: Load Video
Click “Add File” to load the video that you want
Step 2: Choose Your Output Profile and Settings
From “Profile” drop-down list you can choose your output profile according to your need.
You can also click “setteing”adjust the settings of your output video, such as “video/audio encoder”, “Video/audio Bitrate”, “Channels”, “Resolution” and so on..
Step 3: Video Editing
This powerful MTS Converter allows you to do many video editings.
1. Click "Effect" to make special effect for your movie.
You can adjust the “Brightness”, “Contrast”, “Saturation” and also you can use “deinterlacing” to improve you output effect.

2. Trim:
“Trim” function allows you to pick up any part of your video to convert. You can just convert a part of your video that you want.

3: Crop:
Cut off the black edges of the original movie video and watch in full screen on your iPod using the "Crop" function.

Step 4: Conversion
After you have done all the steps above you can click “Start” button to start your conversion.

Tip 3:
Here i also recommend you guys a really nice TS Video Converter, which can convert TS file to all the popular standard video and to other HD video easily. It can also do many video editing works, such as trim, crop, merge and so on. It has super fast conversion speed and high output quality.
MTS Converter is also a really nice tool to convert MTS video file to enable you to edit in windows movie maker and other video editing software. And also allows you to upload your HD video to youtube.com to share with your friends. It can convert MTS file to iPod, iPhone, Zune, PSP, Creative Zen, Xbox video.

2011年6月6日星期一

Make Your Families and Friends A Video for Christmas

What are you going to give your friends/families for Christmas? Do not decide yet? Here I will give you a suggestion. You can make a video and send to them. It will be a great present for them. You may make a video from your own media source: videos, pictures, songs and you can write something you want to say to them.
Do you like my suggestion?
Yes, let's do it.
Here you need a SlideShow Maker to help you to do that.
There are many SlideShow Maker on the internet to download and I use this one.


Things you need:
1. Source: Videos, picture, songs and what you want to say to them.
2. SlideShow Maker

How to make your own videos for your families and friends
Part 1. How to add videos/picture/songs/word
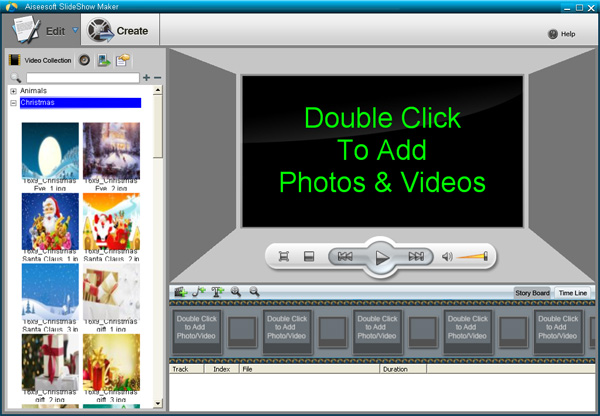
1. How to add videos?

Double click the preview window or the box in the “Story Board” to find the videos on your computer.
It can save your videos in it and you can find it easily in “My video” next time you want to use it.
2. How to add pictures?
You can add videos from your computer the same as add videos.
This SlideShow maker provides you many beautiful pictures on the left side of the interface. It is classified as “Animals”, “Christmas”, “Halloween”, “Plants”, “Scenery”, “Season” and “Wedding”
3. How to add songs?
Click “Add Muisc” in the Story Board to add your music.
4. How to add words on the screen?
Click “Add Text” to add your words on the screen.


After you add the video, picture, or songs, you can see their properties of them and you can also edit it on the property section

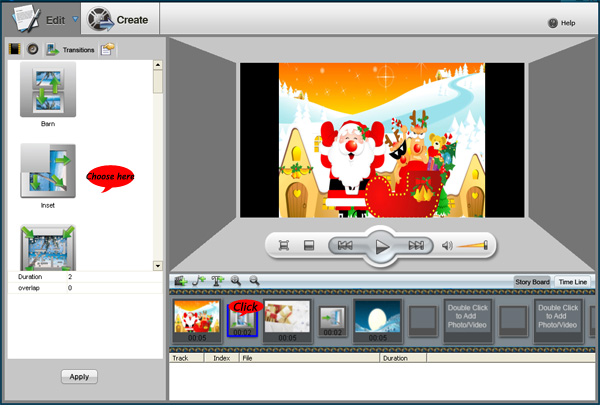
Part 2. How to add transitions between two source you add
A default transition will be added when you add two sources(pictures or videos). When you click the boxes between two source in the story board you are allowed to change the transitions(it provides you 19 transitions for you to choose).
You can adjust the duration and other settings of the transition, such as “Motion”, “IrisStyle” and so on.


Part 3. How to edit the source you added
1. How to edit videos you added

When you click the video you added on the Story Board, you will see the edit interface and you can do crop and trim under the previews window. When you click the triangle at the bottom of the preview window, you can go to the preview interface. In there you can preview your video and full screen is available.
On the left side you can see the detailed settings of the video, such as video size, video effect, aural effect and so on. You an also adjust the settings in property section.

2. How to edit the picture you added
Choose the picture and you can edit it directly on the preview window, such as crop the picture. On the property section you can edit the detailed settings of the picture.

3. How to edit the songs you added
Select the music you added, and on the left side you can see the info of the audio file. You can edit it here directly, such as sample rate, fade in and fade out and so on.

4. How to edit the words you added
You can add your words after you double click the “Sample Text” or select the Caption. Other settings are really easy to set on the left side property section.

After you have done all the things you want to do you can click the “Create” button. Here you will go to the create section. You are allowed to choose the output profile and edit the specific settings, such as “Resolution”, “Encoder”, “Bitrate” and “Frame Rate” and so on.

This powerful SlideShow Maker can help you to create your slideshow to MP4/MKV/WMV/AVI and other popular formats such as: H.264/MPEG-4 AVC, FLV, MPEG-1, MPEG-2, 3GP, 3GPP, DivX, Mov, M4V, DivX, XviD, ASF, SWF, VOB, DV, Super VCD(NTSC, PAL, SECAM), VCD(NTSC, PAL, SECAM) , DVD(NTSC, PAL, SECAM) and so on.

2011年6月5日星期日

How to rip a DVD, convert video and transfer music from ipod to computer with only one tool

This guide aims to show you how to rip a DVD, convert video and transfer music from ipod to computer with only one tool.
It includes 3 parts:
Part 1. How to rip DVD to iPod/iPhone/Sansa/PSP/Zune and other MP4 and MP3 Players
Part 2. How to convert all video to MP4, AVI, FLV, 3GP, WMV, MOV, MPG, RM, RMVB, MKV, VOB…
Part 3. How to backup iPod songs and videos on your computer


Believe or not, to do the things above what you need is download Aiseesoft DVD Converter Suite and few clicks.

Part 1. How to rip DVD to iPod/iPhone/Sansa/PSP/Zune and other MP4 and MP3 Players.
Step 1. Click “DVD Ripper” on the main interface to run Aiseesoft DVD Ripper.


Step 2. Open your DVD Drive and put your DVD in it, then click “Load DVD” and choose “Load DVD” to load your DVD into this best DVD ripper.
Step 3. Choose your output format from the “profile” drop-down list. This best DVD ripper provides you so many formats that out of your expectation, such as “iPod video MPEG 4 (*.mp4)”, “iPhone 3G MOV 640*480 (*.mov)” and so on.

After you choose your output format, you can adjust your output video’s settings, such as “Resolution”, “Frame Rate”, “Bitrate”, “Sample Rate” and so on.
Click “Start” now to begin your conversion and you will get your video soon.

To make your output movie more enjoyable you can do some editings to it through this best DVD ripper. You can choose a part of your movie to convert (trim), remove the black edges of your DVD movie (crop) and also adjust the effect (effect) and select subtitle and audio track.

Part 2. How to convert all video to MP4, AVI, FLV, 3GP, WMV, MOV, MPG, RM, RMVB, MKV, VOB…

Step 1. Click “Total Video Converter” on the main interface to run Aiseesoft Total Video Converter


Step 2. Click “Add File” to load the video you want to convert.
Step 3. Choose output format by clicking “profile” and customize your own output video by
clicking “settings” to adjust the Resolution, Frame Rate, Bitrate and so on.
Before you click “Start” to begin your conversion, you can do some editing works, such as pick up a part of your video to convert(trim), choose your own play region(crop) and put two or more files into one.(merge into one file).
OK, now you can begin your conversion.

Part 3. How to backup iPod songs and videos on your computer.
Step 1. Click “iPod to Computer Transfer” to run Aiseesoft iPod to Computer Transfer.


Step 2. Plug your iPod to your computer and the Aiseesoft iPod to Computer Transfer can automatically scan and find your iPod.
Step 3. Choose the songs and videos you want to backup.
Step 4. Click “export to PC” button to transfer your songs and videos to your Computer.

2011年6月2日星期四

Share: How to Convert DVD to PSP/PS3, convert Videos to PSP/PS3 We all have known that PSP is an excellent game player. However, we can’t play games

We all have known that PSP is an excellent game player. However, we can’t play games all the time; We can achieve other aims with it, such as watching movies, appreciating music…because it has such a big screen for video and a clear earphone for music. For the reason above, I will introduce a practical method to rip DVD movies, convert video files to MP4 format for our PSP. At the same time, we can extract audio from DVD/video files to MP3, AAC PSP audio formats for PSP music.
Now I will share with you a practical tool to solve the problem mentioned above: Aiseesoft PSP Movie Creator. It is the combination of Aiseesoft DVD to PSP Converter and Aiseesoft PSP Movie Converter.

PS3 users share the same feast!

This article includes two parts.
Part 1: How to enjoy DVD on PSP/PS3
Part 2: How to convert Videos for PSP/PS3

Part 1: How to convert DVD to PSP/PS3.
Step 0: Download Aiseesoft DVD to PSP Converter and run it.

Step 1: Click “Load DVD” button to load your DVD.


Note: This professional DVD to PSP Converter can load three DVD source, you can load your DVD from DVD drive, DVD folder in your PC and also IFO file.

Step 2: Select the output video format you want from the “Profile” drop-down list.
Step 3: Click “Start” button to start your conversion and in a short while it will be finished.

Some powerful functions such as "Effect", "Trim", "Crop" are all available.

Part 2: How to convert Videos to PSP/PS3.

Step 0: Download Aiseesoft PSP Movie Converter and run it.

Step 1: Click “Add File” button to add your movie.


Step 2: Select the output video format you want from the “Profile” drop-down list.
Step 3: Click “Start” button to start your conversion and in a short while it will be finished.

Some powerful functions such as "Trim", "Crop", "Snapshot”,"Merge" are all available.

Tips:
In the “Setting” list, you can choose different “audio bitrate”, “video bitrate”. The higher bitrate you set, the more high-fidelity video and music you enjoy on your PSP or PS3.

Key Functions-----Apply to Aiseesoft DVD to PSP Converter and Aiseesoft PSP Movie Converter

"Trim" function ------Split the DVD / video to your favorite edition
There are three methods to set trim time:
Method 1: Enter the start time in the Start Time box and click OK, then enter the end time in the Set End Time box and click OK.
Method 2: Drag the scissors bars under the preview window when you want to trim, then the time will be shown in the Start Time box and End Time box for your reference.
Method 3: Click "Trim From" button when you want to begin your trimming. Click "Trim To" button where you want to stop your trimming.

After you set trim time, the length of the captured clip will be shown in the Select Length box for your reference.

“Merge” function----Join the videos into one file.
Select the videos that you want to join, and then pick “Merge into one file”. After conversion, these chapters will be saved into one file.

2011年6月1日星期三

Aiseesoft DVD Ripper Series Designed for NVIDIA® CUDA

The series of Aiseesoft DVD Riper was redesigned for CUDA and the conversion speed is 6X faster than the old ones.


CUDA (Compute Unified Device Architecture) is a parallel computing architecture, which enables GPU (graphics processing units) handles with
complex computing issues, developed by NVIDIA. Programmers now can write programs for the CUDA computing architecture with the C language. Then the program could run on the processor, which supports the CUDA, with high performance.